Nginx
简介
- Nginx(读作 “engine x”)是一个高性能的 HTTP 与反向代理 Web 服务器,同时也能当 IMAP/POP3/SMTP 代理。它由伊戈尔·赛索耶夫(Igor Sysoev)为俄罗斯访问量第二的 Rambler.ru 站点开发,第一个公开版本 0.1.0 发布于 2004 年 10 月 4 日——这两条日期在本机
docs/CHANGES里能直接查到:文件最后一条就是Changes with nginx 0.1.0 04 Oct 2004,开头那句The first public version.。 - 它以类 BSD 许可证发布。本机
docs/LICENSE原文是两条条件的 BSD-2-Clause,版权行写着Copyright (C) 2002-2021 Igor Sysoev与Copyright (C) 2011-2025 Nginx, Inc.。
- 原笔记里那句「2011 年 6 月 1 日,nginx 1.0.4 发布」是对的,
CHANGES里Changes with nginx 1.0.4 01 Jun 2011一字不差;顺带能看出 1.0.4 那次改的就是本文后面要用的东西——「map指令里正则的大小写敏感性改用~/~*前缀表示」。 - 它出名的原因是:内存占用小、并发能力强、配置直观。官方对自身的定位(nginx.org 首页)是「One master and several worker processes」,即一个 master 进程带多个 worker 进程,worker 以非特权用户运行——这个结构决定了后面「reload 不断连接」「改配置只换 worker」这些行为。
- 官网在 2026-11-03 实测给出的两条版本线是 Mainline 1.31.8 与 Stable 1.30.6;而 Ubuntu 26.04 仓库里能
apt装到的是 1.28.3(CHANGES顶部:Changes with nginx 1.28.3 24 Mar 2026,第一条是修alias+ WebDAVCOPY/MOVE的缓冲区溢出)。也就是说:发行版仓库的版本永远比官网旧一档,追新要自己编译。 - 本文的实测环境:WSL2 的 Ubuntu 26.04.1,
nginx 1.28.3-2ubuntu1.12(built with OpenSSL 3.5.5);另外在 Windows 侧解压跑了一份官方nginx-1.28.3.zip做对照。为了不干扰系统里那个监听 80 端口的正式实例,测试用的是独立配置文件 + 独立端口:8088/8089(路由与反向代理)、8090/8091/8443(静态、return 444、HTTPS)、8092~8097(server_name、鉴权、缓存、rewrite、proxy_pass路径规则)、8112/8113(return与静态文件对照、正向代理)。所有结论后面都会附真实输出。
正向代理
-
概述
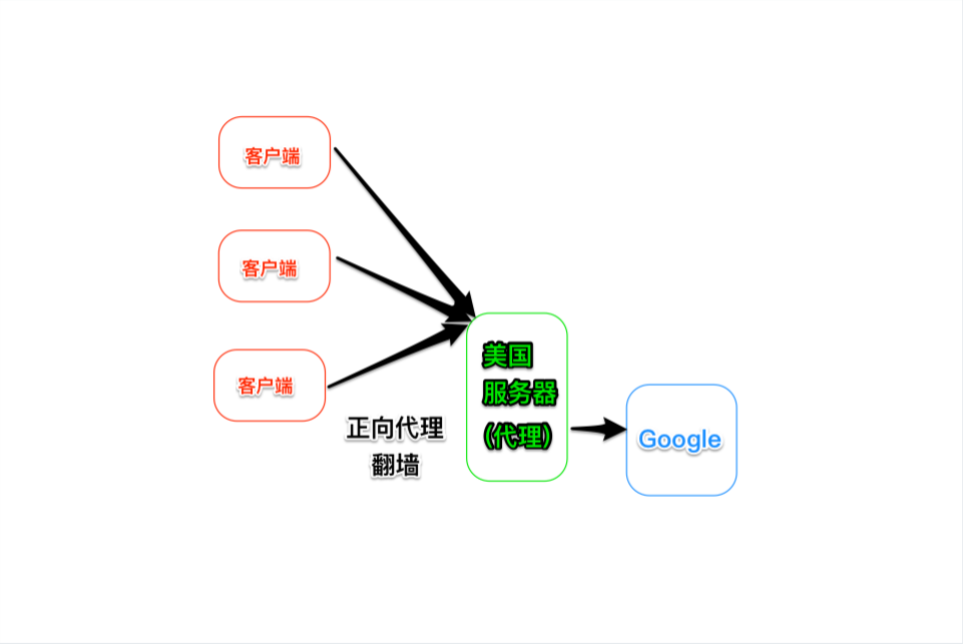
我是一个用户,我访问不了某网站,但我能访问一台代理服务器;这台代理能访问那个网站,于是我连上代理并告诉它「我要这个地址的内容」,它替我去取,再返回给我。客户端显式地把目标地址交给代理,这是正向代理的本质。
-
概念
正向代理是位于客户端与原始服务器(origin server)之间的一台服务器。客户端向代理发请求并指定目标,代理把请求转交给目标服务器,再把拿到的内容回给客户端。客户端知道自己真正访问的是谁,但目标服务器只看到代理的 IP。
-
用途
- 给防火墙内的局域网客户端提供访问 Internet 的出口(公司/学校的上网代理)。
- 用缓冲(缓存)特性减少重复的对外带宽消耗。
- 隐藏客户端真实身份,或让多台内网机器共用一个公网出口。
-
图解
-
用 nginx 搭一个正向代理(实测)
nginx 默认是「按
server_name找虚拟主机」,而正向代理的请求行里带的是完整 URL,所以要靠$host/$http_host变量把目标地址取出来再转发。最小可用配置:1
2
3
4
5
6
7
8
9
10
11# /etc/nginx/nginx.conf 的 http 段里
resolver 10.255.255.254 valid=5s ipv6=off; # 目标域名要靠它解析
server {
listen 8888;
location / {
proxy_pass http://$http_host; # 注意是 $http_host 不是 $host
proxy_set_header Host $http_host;
}
}客户端这样用:
1
curl -s -x http://127.0.0.1:8888 http://127.0.0.1:8101/hdrs
1
2GET /hdrs HTTP/1.0
Host: 127.0.0.1:8101$host会把端口丢掉,这点实测很坑。第一版配置我写的是proxy_pass http://$host;,结果http://127.0.0.1:8101/hdrs被转到了 80 端口,客户端拿到的是另一台 nginx 的 404 页面,而不是 8101 后端的响应。换成$http_host(保留主机:端口原样)才正确。- 目标写成域名时必须配
resolver。proxy_pass里一旦带变量,nginx 就不再在启动时解析域名,而是运行时查resolver;不配就直接报no resolver defined to resolve xxx。本机配了resolver 10.255.255.254(WSL 的/etc/resolv.conf里那个地址)之后,curl -x ... http://localhost:8101/hdrs才通,上游收到的Host是localhost:8101。 - 千万别把正向代理挂在对外端口上还不加访问控制。它本质是一个「任意地址转发器」,公网上的开放正向代理会被拿去做扫描、洗流量、绕过 IP 黑名单。生产上要么
allow/deny限内网,要么加auth_basic,要么只监听127.0.0.1。 - 还有个反直觉的实测结果:这台代理不经过
-x直接被访问时,$http_host就是它自己(127.0.0.1:8113),于是它把请求转给自己,瞬间形成回环,返回 500,error.log 里打的是因为每一跳都会占掉一个连接,很快就撞到1
[alert] 64 worker_connections are not enough while connecting to upstream
worker_connections上限。这条报错原文后面「常见报错」一节还会再见到。
反向代理
-
概念
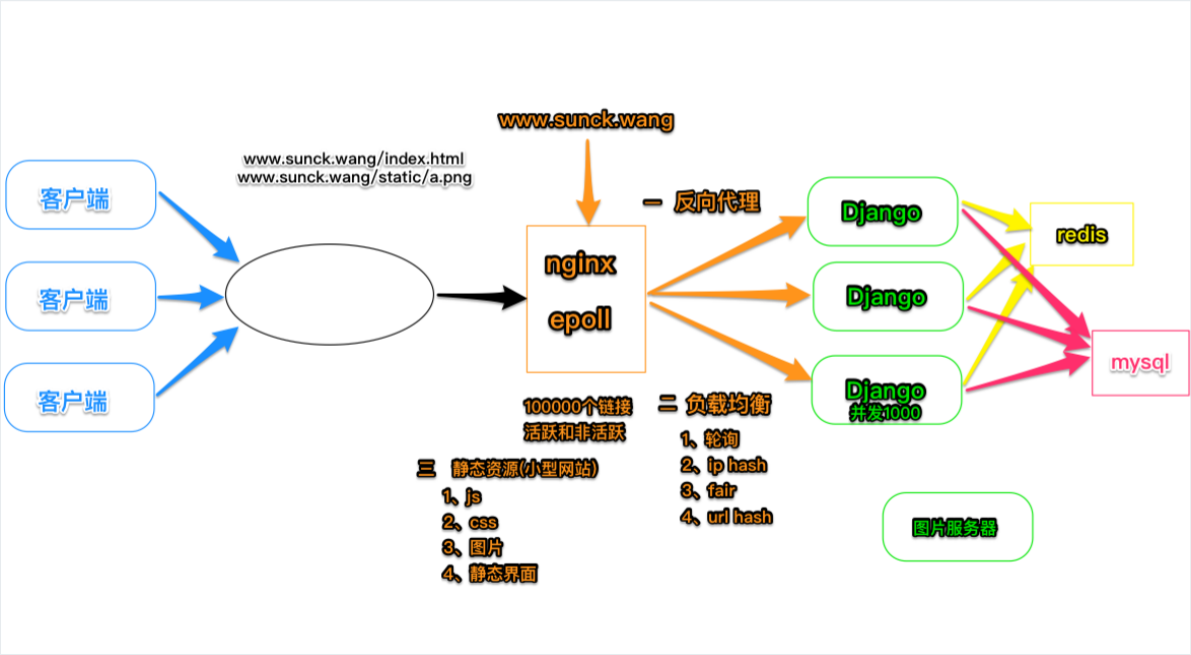
反向代理是替服务器接收请求的那一层:客户端以为自己访问的就是站点本身,实际上请求被 nginx 收下,转给内网的真实服务,再把响应原路返回。对外表现为一个站点,对内可以是一台或多台机器。
-
用途
- 把防火墙后面的服务器暴露给 Internet 用户访问,后端机器不需要公网地址。
- 为后端多台机器做负载均衡;或者给慢后端做缓冲,让慢服务不至于拖垮整个站点。
- 启用高级 URL 策略:让分布在不同后端系统上的页面,对外呈现成同一个 URL 空间。
- 统一做 TLS 终结、HTTP/2、压缩、缓存、鉴权、限流——这些活儿不必每个后端各实现一遍。
-
图解
-
最小可用配置(实测)
1
2
3
4
5
6
7
8
9
10
11
12# 后端:本机 127.0.0.1:8101(一个 Python http.server)
server {
listen 8089;
server_name proxy.local;
location / {
proxy_pass http://127.0.0.1:8101;
proxy_set_header Host $host;
proxy_set_header X-Real-IP $remote_addr;
proxy_set_header X-Forwarded-For $proxy_add_x_forwarded_for;
}
}1
curl -s http://127.0.0.1:8089/hdrs
1
2
3
4
5
6
7GET /hdrs/hdrs HTTP/1.0
Host: 127.0.0.1
X-Real-IP: 127.0.0.1
X-Forwarded-For: 127.0.0.1
X-Forwarded-Proto: http
User-Agent: curl/8.18.0
Connection: close -
不写
proxy_set_header时,上游到底看到什么(实测)原笔记说「默认情况反向代理不转发请求中的 Host 头部」,准确说法是:nginx 会把
Host改写成$proxy_host(也就是proxy_pass里那台上游的地址),而不是「不发」。把上面那四条proxy_set_header全删掉再打同一个后端:1
curl -s http://127.0.0.1:8089/nohost/hdrs
1
2
3
4
5
6GET /nohost/hdrs HTTP/1.0
Host: 127.0.0.1:8101 # 变成上游地址了
X-Real-IP: None # 这三个头默认根本不存在
X-Forwarded-For: None
X-Forwarded-Proto: None
Connection: close- 这就是为什么基于域名路由的后端(Django 的
ALLOWED_HOSTS、虚拟主机、request.get_host())必须显式设置proxy_set_header Host $host;,否则后端看到的 Host 是内网地址。 - nginx 到上游默认用 HTTP/1.0 +
Connection: close,即使客户端用的是 1.1 长连接。实测客户端发 HTTP/1.1、Connection: keep-alive,上游收到的请求行仍是GET /hdrs/hdrs HTTP/1.0、Connection: close。要改成 1.1 得写proxy_http_version 1.1;并把Connection置空:1
2
3
4
5location /http11/ {
proxy_pass http://127.0.0.1:8101;
proxy_http_version 1.1;
proxy_set_header Connection "";
}WebSocket 转发必须这么写,原因见「WebSocket 转发」一节。1
GET /http11/hdrs HTTP/1.1
- 客户端 IP 默认不会传给后端,
X-Real-IP、X-Forwarded-For都得自己加;后端要拿真实 IP,还得配合real_ip模块(本机这份 nginx 编译时带了--with-http_realip_module,可以直接用set_real_ip_from+real_ip_header)。
- 这就是为什么基于域名路由的后端(Django 的
负载均衡
-
概述
负载均衡是把多台服务器组成一个对称的集合,每台地位等价、都能单独对外提供服务;再通过某种分配算法把外部请求分给其中一台,由它独立回应客户端。nginx 里这件事由
upstream模块做:先声明一组后端,再在proxy_pass里按名字调用。 -
作用
均摊客户请求,解决大量并发访问问题;顺带提供「后端挂了自动摘除」的能力,用户访问不受单台故障影响。
-
四种调度算法(原笔记的说法要更正)
- 轮询(默认)
每个请求按时间顺序逐一分配到不同后端;某台宕机时自动剔除。weight参数指定权值,值越大被分到的概率越高,适合后端机器性能不均的情况。实测(两台无 weight,8 次请求):严格 1:1 交替。带1
24 backend 8101 /rr2/x
4 backend 8102 /rr2/xweight=3与weight=1时,12 次请求实测 10:2——接近 3:1 但不是精确 3:1,因为调度是平滑加权的,样本小的时候会偏。 ip_hash
按客户端 IP 的哈希结果分配,同一个 IP 固定落到同一台后端,能缓解动态页面的 session 共享问题(前提是这个 IP 真的稳定,见下面那条注意)。实测同一客户端 6 次、10 次请求全部落在 8101:1
6 backend 8101 /rr/x
hash(即原笔记说的 url_hash)
按访问 URL 的哈希分配,让同一个 URL 定向到同一台后端,提高后端缓存命中率。原笔记说「Nginx 本身不支持 url_hash,必须安装 hash 软件包」已经过时:hash指令从 1.7.2 起就是内置的,写法是hash $request_uri;,不需要任何额外软件包。实测三个不同 URL 各自稳定:另外1
2
35 backend 8102 /urihash/a
5 backend 8101 /urihash/b
5 backend 8102 /urihash/chash还支持consistent参数(一致性哈希)。实测hash $remote_addr consistent把同一个客户端映射到了 8102,而ip_hash映射到的是 8101——两者算法不同,落点也不同,别以为consistent只是「加个开关」。fair
按后端响应时间分配,响应快的优先。这条确实不是 nginx 内置的,它是第三方模块(upstream_fair),原笔记这点没错。内置的近似替代品是least_conn(优先选当前连接数最少的那台)和random。实测least_conn串行 6 次是 3:3;random two8 次全落 8101——因为后端响应太快(毫秒级),「随机挑两台里负载低的」这一层根本区分不出来。
- 轮询(默认)
-
状态与容错参数
参数 含义 实测/说明 down当前 server 暂时不参与负载均衡 配合 backup用:把主用机器标down时流量立刻切到 backupbackup备份机器,其他非 backup 机器全故障或全忙时才启用,压力最轻 实测主用在线时 5 次请求 一次都没走 backup max_fails允许请求失败的次数,默认 1;超过后按 proxy_next_upstream的规则处理默认值就是 1,很多人以为要显式写 fail_timeout经历 max_fails次失败后暂停服务的时间,默认 10s;与max_fails配合使用实测被标记不可用期间,请求直接走健康的那台,客户端仍是 200 weight权值,默认 1 见上面 10:2 的实测 max_conns该后端的最大并发连接数,默认 0(不限) 本机后端响应太快,4 路并发测不出效果(全 200),生产上要配合慢后端才看得出 -
一条重要注意
- 原笔记写「当负载调度算法为
ip_hash时,后端服务器在负载均衡调度中的状态不能是weight和backup」。实测这条只对了一半:也就是说1
2
3ip_hash + weight=2 -> nginx -t 通过(weight 被静默忽略,不参与分配)
ip_hash + backup -> [emerg] balancing method does not support parameter "backup"
ip_hash + down -> nginx -t 通过,且该机确实不参与分配backup是硬报错,weight是软忽略——后者更危险,因为它不告诉你权值没生效。 - 同一个
upstream里写两种算法(ip_hash; least_conn;)时,nginx -t也过,但启动会打并以最后写的那个为准。实测这样配下来 4 次请求全落 8102(因为另一台标了1
[warn] load balancing method redefined in /etc/nginx/nginx.conf:6
down),ip_hash完全没起作用。 - 更实用的一条是:
ip_hash依赖客户端 IP,而真实互联网用户经常在小区间跳变(移动网络、公司出口 NAT),「同一 IP = 同一用户」这个前提并不牢靠;要真正的会话保持,应该把 session 放到 Redis 之类的共享存储里,而不是指望ip_hash。
- 原笔记写「当负载调度算法为
-
完整示例(本机实测通过的写法)
1
2
3
4
5
6
7
8
9
10
11
12
13upstream suyin {
# ip_hash; # 开了 ip_hash 就不能再给 server 写 weight/backup
server 127.0.0.1:8101 weight=3 max_fails=1 fail_timeout=30s;
server 127.0.0.1:8102 max_fails=1 fail_timeout=30s;
server 127.0.0.1:8103 backup;
}
server {
listen 8089;
location / {
proxy_pass http://suyin;
}
}- 原笔记这段里有一批 OCR 造成的拼写错误:
welght=2、max_falls=1、fall_timeout=300s,以及「负债负载均衡」应为「负责负载均衡」;末尾还多出一个右花括号(})导致结构不配对。这类拼写错误 nginx 不会逐个提示,nginx -t只会报第一个致命错误,所以抄完务必跑一次-t。
- 原笔记这段里有一批 OCR 造成的拼写错误:
-
Ubuntu / Debian(发行版仓库,本机实测走的就是这条路)
1
2
3
4sudo apt-get update
apt-cache policy nginx | head -3
sudo apt-get install -y nginx
systemctl status nginx --no-pager | head -51
2
3
4
5nginx:
Installed: (none)
Candidate: 1.28.3-2ubuntu1.12
● nginx.service - A high performance web server and a reverse proxy server
Active: active (running)- 装完立刻就是一个能用的服务:
active+enabled(开机自启),默认站点监听 80,ss -ltnp能看到 80 由 nginx 占用。想另起测试实例时要么先systemctl stop nginx,要么像本文这样用独立配置文件避开 80。 - nginx.org 官方 apt 源在 Ubuntu 26.04 上目前没有发布线。照网上常见的写法加源:实测报错:
1
2
3echo 'deb [signed-by=/usr/share/keyrings/nginx-archive-keyring.gpg] http://nginx.org/ubuntu resolute nginx' \
| sudo tee /etc/apt/sources.list.d/nginx.list
sudo apt-get update所以这台机器上「apt 装最新稳定版」只能拿到 1.28.3;要 1.30/1.31 得自己编译(见下一个页签)。1
E: The repository 'http://nginx.org/ubuntu resolute Release' does not have a Release file.
- 布局是 Debian 风格而不是官方包风格,
ls /etc/nginx实测有:conf.d/、sites-available/、sites-enabled/、modules-available/、modules-enabled/、snippets/、mime.types、proxy_params、fastcgi_params、scgi_params、uwsgi_params。本机实测conf.d/和modules-enabled/都是空的,snippets/里有fastcgi-php.conf与snakeoil.conf两个现成片段。
- 装完立刻就是一个能用的服务:
-
RHEL / CentOS / Rocky:
sudo dnf install nginx,主配置在/etc/nginx/nginx.conf,站点目录约定不同(没有sites-enabled,用conf.d/*.conf)。 -
macOS:
brew install nginx,默认前缀在/opt/homebrew/(Apple Silicon)或/usr/local/(Intel),且 brew 版监听的是 8080(非 root 不能绑 1024 以下端口)。这条本机未实测,只作为常见做法记录。
-
源码编译能装到官网任意版本,也能自选编译哪些模块。本机实测过程:
1
2
3
4sudo apt-get install -y build-essential zlib1g-dev libpcre2-dev libssl-dev
wget https://nginx.org/download/nginx-1.28.3.tar.gz
tar -xzf nginx-1.28.3.tar.gz
cd nginx-1.28.3- 解压参数是
-z不是-Z。原笔记写的tar -xZvf nginx-1.11.3.tar.gz里-Z对应的是老的.Z(compress)格式,对.tar.gz会直接失败;正确写法是tar -xzvf或tar -xzf。 - 原笔记那句
tar -xZvf pcre- -841.tar.gz除了同样的-Z问题,文件名中间还多了一个空格和多余的-,本来就不可能存在这样的文件。
- 解压参数是
-
配置(本机实测通过的参数组合):
1
2
3
4
5
6
7./configure --prefix=/usr/local/nginx \
--with-http_ssl_module \
--with-http_v2_module \
--with-http_realip_module \
--with-http_stub_status_module \
--with-http_gzip_static_module \
--with-threads- 原笔记里
--with-pcre=../pcre-8.41 --with-openssl=../openssl-1.0.1这种「把第三方库源码一起编进来」的写法本身没错,但现在不该这么用了:openssl-1.0.1早在 2016 年就 EOL(有已知漏洞),pcre-8.41也已停维护;nginx 1.21.5 起 PCRE 换成了 PCRE2,--with-pcre=指向 PCRE1 源码目录会直接报错。正确做法是用系统的开发包(libpcre2-dev、libssl-dev),让 configure 自己找。 - 原笔记说「如果出现
pcre.h No such file or directory,安装libpcre3 libpcre3-dev」——这条只对 1.21.5 之前的老 nginx 成立;新版要装的是libpcre2-dev,报错文件名也变成pcre2.h。
- 原笔记里
-
编译与安装:
1
2make -j8
sudo make install- 本机实测:
configure+make -j8+make install三步在 8 核 WSL 上不到一分钟就跑完(/usr/local/nginx里四个子目录的时间戳都在同一分钟内),编译期-Werror打开也没有任何警告。装完/usr/local/nginx只占 5.2M,源码树/usr/local/src/nginx-1.28.3占 26M。 make install的日志很罗嗦,全是一串test -f '...' || cp ...:它会把nginx.conf、mime.types、fastcgi_params、fastcgi.conf、scgi_params、uwsgi_params各拷一份同名的.default文件留作参照,再顺手mkdir -p logs。所以升级配置时想恢复出厂设置,直接看*.default。
- 本机实测:
-
装完的目录结构(
--prefix=/usr/local/nginx,实测):1
2
3
4conf/ 配置文件(nginx.conf、mime.types、fastcgi_params、uwsgi_params…外加同名的 .default 参照)
html/ 静态网页(index.html、50x.html)
logs/ 日志文件(access.log、error.log、nginx.pid)
sbin/ 可执行文件(nginx,约 5.1M)- 原笔记这段是对的,只有一个小问题:源码版不会自带 systemd 单元,
systemctl start nginx找不到服务,得自己写一个(写法可参考《Linux 系统服务》那篇)。
- 原笔记这段是对的,只有一个小问题:源码版不会自带 systemd 单元,
-
验证:
1
2/usr/local/nginx/sbin/nginx -V
sudo /usr/local/nginx/sbin/nginx -t -c /usr/local/nginx/conf/nginx.conf1
2
3
4
5
6
7nginx version: nginx/1.28.3
built by gcc 15.2.0 (Ubuntu 15.2.0-16ubuntu1)
built with OpenSSL 3.5.5 27 Jan 2026
TLS SNI support enabled
configure arguments: --prefix=/usr/local/nginx --with-http_ssl_module --with-http_v2_module
--with-http_realip_module --with-http_stub_status_module --with-http_gzip_static_module
--with-threads- 和发行版那份对比就能看出取舍:源码版只编了你要的模块(这里就没有
http_v3、stream、dav、sub),而apt那份几乎全编上了、还带--with-debug。想知道某个指令为什么「不认识」,nginx -V一比对就明白。
- 和发行版那份对比就能看出取舍:源码版只编了你要的模块(这里就没有
-
官方直接提供 Windows 二进制,解压即用,适合本地试配置;不适合压测和生产。本机实测:
1
2
3
4# 下载 https://nginx.org/download/nginx-1.28.3.zip(实测 2,743,427 字节,44 个条目)
Expand-Archive nginx-win.zip -DestinationPath .
cd nginx-1.28.3
.\nginx.exe -V1
2
3
4
5
6
7
8
9nginx version: nginx/1.28.3
built by cl 19.44.35217 for x86
built with OpenSSL 3.5.5 27 Jan 2026
configure arguments: --with-cc=cl --builddir=objs.msvc8 --with-debug --prefix=
--conf-path=conf/nginx.conf --pid-path=logs/nginx.pid --http-log-path=logs/access.log
--error-log-path=logs/error.log --sbin-path=nginx.exe
--http-client-body-temp-path=temp/client_body_temp --http-proxy-temp-path=temp/proxy_temp
... --with-cc-opt=-DFD_SETSIZE=1024 --with-pcre=objs.msvc8/lib/pcre2-10.47
--with-zlib=objs.msvc8/lib/zlib-1.3.2 --with-openssl=objs.msvc8/lib/openssl-3.5.5 ...- 注意
built by cl ... for x86:官方 Windows 包是 32 位构建;--prefix=是空的,所以必须先cd到解压目录或用-p指定前缀,否则它找不到conf/nginx.conf和logs/。 - 少了什么:Windows 版没有
--with-http_v3_module(QUIC/HTTP/3)、没有perl/xslt/image_filter/geoip这些模块;--with-mail、--with-stream倒是直接编进去了(Linux 版是 dynamic)。 -DFD_SETSIZE=1024是硬伤:单进程能同时看护的套接字数被编译期写死在 1024,这就是「Windows 版并发上不去」的根源。
- 注意
-
启动与停止(实测):
1
2
3.\nginx.exe -p . -c conf\nginx_win.conf # 前台阻塞运行,Ctrl+C 或另开窗口发信号
.\nginx.exe -s reload -p . -c conf\nginx_win.conf
.\nginx.exe -s quit -p . -c conf\nginx_win.conf- 与 Linux 版不同,
nginx.exe启动后不转后台,命令行会一直占着那个窗口;窗口被关掉,服务就没了。要常驻可以用start /B nginx.exe或注册成服务(第三方WinSW/NSSM)。
- 与 Linux 版不同,
-
实测的两条平台差异:
1
2
3
42026/11/04 01:57:20 [notice] using the "select" event method
2026/11/04 01:57:20 [notice] start worker processes
2026/11/04 01:57:20 [notice] start worker process 2392
2026/11/04 01:57:20 [notice] start worker process 50412- 事件模型是
select,不是 Linux 上的epoll;日志里每个 worker 还会打create thread ...(Windows 版靠线程池做文件 IO)。 - 网上流传的「Windows 版只能起一个 worker」在本版不成立:配置写
worker_processes 2,实测Get-Process nginx得到 3 个进程(1 master + 2 worker)。 reload与quit信号都正常工作,实测 reload 后仍能 200,quit之后进程数归 0。
- 事件模型是
相关命令
-
命令行选项(本机
nginx -h原文)1
2
3
4
5
6
7
8
9
10
11
12
13
14
15Usage: nginx [-?hvVtTq] [-s signal] [-p prefix]
[-e filename] [-c filename] [-g directives]
Options:
-?,-h : this help
-v : show version and exit
-V : show version and configure options then exit
-t : test configuration and exit
-T : test configuration, dump it and exit
-q : suppress non-error messages during configuration testing
-s signal : send signal to a master process: stop, quit, reopen, reload
-p prefix : set prefix path (default: /usr/share/nginx/)
-e filename : set error log file (default: stderr)
-c filename : set configuration file (default: /etc/nginx/nginx.conf)
-g directives : set global directives out of configuration file- 注意
-s后面只认四个信号:stop、quit、reopen、reload。原笔记把-c说成「置顶配置文件」,其实是「指定配置文件」。 -p的默认值来自编译参数--prefix:Ubuntu 包是/usr/share/nginx/,源码装是--prefix=给的那个目录,Windows 版是空串(所以必须显式-p)。-e默认stderr——这解释了为什么用nginx -t时错误直接打在终端上。
- 注意
-
常用操作
1
2
3
4
5
6
7
8
9
10
11
12
13
14
15
16
17
18
19
20
21# 语法检查(改配置的第一步,永远先跑这个)
sudo nginx -t
# 语法检查 + 把 include 展开后的完整配置打到标准输出(排查「到底加载了哪个文件」最好用)
sudo nginx -T | less
# 重载配置:master 不变,worker 换新
sudo nginx -s reload
# 重新打开日志文件(日志切割后必须发这个,否则继续往旧 inode 写)
sudo nginx -s reopen
# 优雅退出 / 立即退出
sudo nginx -s quit
sudo nginx -s stop
# 用指定配置文件启动一个完全独立的实例(本文所有测试都这么做)
sudo nginx -c /etc/nginx/nginx_test.conf
# 不进后台,前台运行(容器里必须这样,见最后一条)
sudo nginx -g 'daemon off;'-t的退出码:正常时 0,配置有问题时 1,且第一个致命错误只报一条。实测把一个server块写到http外面:1
2nginx: [emerg] "server" directive is not allowed here in /tmp/ngx/bad.conf:7
nginx: configuration file /tmp/ngx/bad.conf test failed-s reload只往终端打一行,然后退出:真正的换血过程记在 error.log 里,实测 reload 前后 master pid 不变(21599 → 21599),worker pid 变了(21836 → 21985)——这正是「reload 不断现有连接」的实现方式。1
2026/11/04 00:02:56 [notice] 21835#21835: signal process started
- 用 systemd 管理时优先
systemctl reload nginx、systemctl restart nginx,别混用nginx -s:单元文件里PIDFile=指向的 pid 和nginx -s找的可能不是同一个实例(尤其你用了-c起过额外实例时)。 - 容器里必须
daemon off,否则 master 一退出容器就结束:1
CMD ["nginx", "-g", "daemon off;"]
-
看端口、抢端口
1
2
3
4ss -ltnp | grep :80 # Linux 上正确写法
sudo ss -ltnp 'sport = :80' # 精确匹配 80,不会把 8080 也带出来
sudo fuser -k 80/tcp # 干掉占用 80 端口的进程
sudo lsof -i :80 # 另一种查法- 原笔记的
netstat -ano | grep 80是 Windows 的语法(-a -n -o是 Windows netstat 的参数组合,Linux 的netstat没有-o这个含义)。Linux 上应该用ss -ltnp:-l只列监听、-tTCP、-n不做名称解析、-p带上进程信息。 net-tools(netstat)在新版 Ubuntu 里默认不装,apt install net-tools才有;ss属于iproute2,是现成的。fuser -k 80/tcp来自psmisc包,本机实测装完可用。- 实测正式实例跑起来时
ss -ltnp的输出:第二列那个1
LISTEN 0 511 0.0.0.0:80 users:(("nginx",pid=20968,...))
511是 backlog,和worker_connections不是一回事。
- 原笔记的
-
版本与编译信息
1
2nginx -v # 只要版本号
nginx -V # 版本号 + 完整 configure 参数1
2
3
4
5
6
7
8
9
10
11
12
13
14
15
16
17
18
19
20nginx version: nginx/1.28.3 (Ubuntu)
built by gcc 15.2.0 (Ubuntu)
built with OpenSSL 3.5.5 27 Jan 2026
TLS SNI support enabled
configure arguments: --with-cc-opt='-g -O2 ...' --with-ld-opt=... --prefix=/usr/share/nginx
--conf-path=/etc/nginx/nginx.conf --error-log-path=stderr --pid-path=/run/nginx.pid
--http-client-body-temp-path=/var/lib/nginx/body --http-proxy-temp-path=/var/lib/nginx/proxy
--http-fastcgi-temp-path=/var/lib/nginx/fastcgi --http-scgi-temp-path=/var/lib/nginx/scgi
--http-uwsgi-temp-path=/var/lib/nginx/uwsgi --modules-path=/usr/lib/nginx/modules
--with-compat --with-debug --with-http_ssl_module --with-http_v2_module --with-http_v3_module
--with-http_realip_module --with-http_stub_status_module --with-http_gzip_static_module
--with-http_sub_module --with-http_slice_module --with-http_addition_module
--with-http_auth_request_module --with-http_dav_module --with-http_flv_module
--with-http_mp4_module --with-http_gunzip_module --with-http_random_index_module
--with-http_secure_link_module --with-pcre-jit
--with-http_geoip_module=dynamic --with-http_image_filter_module=dynamic
--with-http_perl_module=dynamic --with-http_xslt_module=dynamic
--with-mail=dynamic --with-mail_ssl_module
--with-stream=dynamic --with-stream_realip_module --with-stream_ssl_module
--with-stream_ssl_preread_module --with-stream_geoip_module=dynamic --with-threadsnginx -V是排查「为什么这个指令不认识」的第一现场:--with-stream=dynamic意味着要用四层代理得先apt install libnginx-mod-stream,否则配置里写stream {}会报"stream" directive is not allowed here;--with-http_v3_module在则说明支持 QUIC。- 那一串
--http-*-temp-path=/var/lib/nginx/...是各类临时文件目录。看到... failed (13: Permission denied)之类的报错时,先按这几个路径排查属主。
测试
-
启动与首次访问
源码安装版:
1
2sudo /usr/local/nginx/sbin/nginx # 启动(默认后台)
ps -ef | grep '[n]ginx' # 看进程1
2
3
4root 20965 nginx: master process /usr/sbin/nginx -g daemon on; master_process on;
www-data 20968 nginx: worker process
www-data 20969 nginx: worker process
...(`worker_processes auto` 在 8 核机器上正好 8 个 worker)- 浏览器里输入服务器 IP,看到 Welcome to nginx 页即成功。命令行验证更靠得住:
1
2curl -s -o /dev/null -w 'code=%{http_code} size=%{size_download}\n' http://127.0.0.1/
curl -sI http://127.0.0.1/ | head -31
2
3
4code=200 size=615
HTTP/1.1 200 OK
Server: nginx/1.28.3 (Ubuntu)
Content-Type: text/htmlsize=615就是/var/www/html/index.nginx-debian.html的大小;Server头里那个(Ubuntu)来自发行版配置的server_tokens build;,下一节会讲它的三种取值。
- 浏览器里输入服务器 IP,看到 Welcome to nginx 页即成功。命令行验证更靠得住:
-
改完配置怎么确认生效
1
2sudo nginx -t && sudo nginx -s reload
curl -s -D - -o /dev/null http://127.0.0.1:8088/exact | tr -d '\r'1
2
3
4HTTP/1.1 200 OK
Server: nginx/1.28.3
Content-Type: text/plain
Content-Length: 12- 排错顺序永远是「
-t→reload→ 打一次请求 → 看error.log」。reload成功不代表配置符合你的预期,只代表语法合法。 - 如果
reload后行为没变,九成是这三种情况之一:改的不是被include加载的那个文件(用nginx -T确认)、浏览器/中间层缓存、或者你其实起了两个实例(ps -ef | grep nginx数一下 master)。
- 排错顺序永远是「
-
一个能自证「reload 不断连接」的最小实验
1
2
3
4# 终端 A:持续打请求
while :; do curl -s -o /dev/null -w '%{http_code} ' http://127.0.0.1:8088/exact; done
# 终端 B:改配置并重载
sudo nginx -s reload -c /etc/nginx/nginx_test.conf- 实测 reload 期间请求序列里没有出现失败,error.log 里只有旧 worker
gracefully shutting down、新 workerstart worker process这类 notice。原理就是上一条说的:master 不动,旧 worker 处理完存量连接才退出。
- 实测 reload 期间请求序列里没有出现失败,error.log 里只有旧 worker
-
收尾清理(本机实测)
1
ss -ltn | grep -E ':(8088|8089|8090|8091|8443|8112|8113)' | wc -l # 应为 0
配置
-
配置文件大致结构
1
2
3
4
5
6
7
8
9
10
11
12
13
14
15
16
17
18
19
20
21
22
23
24
25
26
27
28
29
30
31
32
33
34
35
36
37#user nobody;
worker_processes 1;
error_log logs/error.log notice;
#pid logs/nginx.pid;
events {
worker_connections 1024;
}
http {
include mime.types;
default_type application/octet-stream;
sendfile on;
keepalive_timeout 65;
#gzip on;
upstream myproject {
server 127.0.0.1:8101;
server 127.0.0.1:8102;
}
server {
listen 80;
server_name localhost;
location / {
root html;
index index.html index.htm;
}
}
server {
listen 8080;
server_name other.example.com;
# 另一个虚拟主机
}
}- 上面这份是源码安装自带的
/usr/local/nginx/conf/nginx.conf的骨架(实测文件 2656 字节),原笔记画的结构就是它,只是被 OCR 弄坏了:worker_ processes1(应为worker_processes 1;)、error log logs/error.log(应为error_log)、pid和logs/nginx.pid;被拆成两行、worker_ _rlimit_ nofile(多了一个下划线)、locate {}(应为location {}),而且http段里第一个server的右花括号位置错了。 - 结构规则只有三条:
main在最外层、events与http是main的直接子块、upstream/server在http里,location在server里。写错层级时 nginx 报的就是那句"server" directive is not allowed here。 stream(四层代理)与mail和http平级,本机这份 Ubuntu 包里它们是=dynamic,默认没加载,所以直接写会报"stream" directive is not allowed here。
- 上面这份是源码安装自带的
-
主要区域
main(全局设置)events(工作模式与连接数上限)http(HTTP 服务,内含upstream与server)server(虚拟主机)location(URL 匹配)upstream(后端服务器组)
-
发行版实际加载了哪些文件(Ubuntu 26.04 实测)
1
2sudo nginx -T 2>/dev/null | grep -E 'configuration file|^# configuration prefix'
grep -n include /etc/nginx/nginx.conf1
2
3
46:include /etc/nginx/modules-enabled/*.conf;
60: include /etc/nginx/mime.types;
78: include /etc/nginx/conf.d/*.conf;
79: include /etc/nginx/sites-enabled/*;- 也就是说 Ubuntu 的主配置在最后
include了conf.d/*.conf和sites-enabled/*;sites-enabled/default是个指向sites-available/default的符号链接,这就是 Debian 系「加站点 = 写 available + 建软链 enabled」的由来。 include的相对路径是按配置文件所在目录解析的,不是按--prefix。本机实测把配置放在/tmp/ngx3/uv.conf并写include uwsgi_params;,nginx 报的是:它并没有去1
[emerg] open() "/tmp/ngx3/uwsgi_params" failed (2: No such file or directory) in /tmp/ngx3/uv.conf:8
--prefix=/usr/share/nginx找。跨目录复用配置片段时,写绝对路径最省事。
- 也就是说 Ubuntu 的主配置在最后
main(全局设置)
-
内容
1
2
3
4
5
6
7user www-data; # worker 以哪个用户/组运行
worker_processes auto; # 实测 8 核 → 8 个 worker
worker_cpu_affinity auto; # 把 worker 绑到不同核,减少迁移
pid /run/nginx.pid; # master 的 pid 文件
error_log /var/log/nginx/error.log notice; # 全局错误日志 + 级别
worker_rlimit_nofile 65535; # 单进程可打开的最大文件描述符
include /etc/nginx/modules-enabled/*.conf; # 动态模块,必须在最外层- 这几行不是凭空写的:
user www-data;、worker_processes auto;、worker_cpu_affinity auto;、pid /run/nginx.pid;、error_log /var/log/nginx/error.log;、include /etc/nginx/modules-enabled/*.conf;正是 Ubuntu 26.04 那份/etc/nginx/nginx.conf的开头六行(实测原文)。
- 这几行不是凭空写的:
-
user
指定 worker 进程的运行用户与用户组,默认
nobody。master 仍以 root 运行(要绑 1024 以下端口、要写 pid 文件),只有 worker 降权。Ubuntu 包里是www-data。- 权限模型值得记一句:worker 是低权限的,所以站点目录要让
www-data能读;反过来,nginx.conf里user指令本身只有 root 起的 master 能读到。 - 原笔记「默认由 nobody 账号运行」在源码版成立;
apt装的会显式写www-data。
- 权限模型值得记一句:worker 是低权限的,所以站点目录要让
-
worker_processes
要开多少个 worker 子进程。
auto表示按 CPU 核数,实测 8 核 WSL 上ps -C nginx数出来正好 8 个 worker。- 原笔记「每个 Nginx 进程平均耗费 10M~12M 内存」是经验值,跟编译模块和数据量强相关,别当容量规划依据;真要估内存看
ps -o rss= -p <worker pid>。 - 「一般指定 1 个进程就足够」这条要分场景:单核容器里 1 个是对的,多核机器上写 1 就是自废武功。
- 实测 Windows 版也能开多 worker(
worker_processes 2→ 1 master + 2 worker),网上那句「Windows 版只能一个 worker」已过时。
- 原笔记「每个 Nginx 进程平均耗费 10M~12M 内存」是经验值,跟编译模块和数据量强相关,别当容量规划依据;真要估内存看
-
error_log
全局错误日志的位置与级别,级别从低到高:
1
debug info notice warn error crit alert emerg
- 原笔记只列到
crit,缺alert和emerg。 - 级别是「记这个级别及更严重的」,不写级别时默认是
warn。实测只写error_log /tmp/x.log;时,启动全过程那些 notice 行一条都不会落盘(日志文件是空的);改成... error_log /tmp/x.log notice;才出现下面这些行:写1
2
3
4
5[notice] using the "epoll" event method
[notice] start worker processes
[notice] start worker process 22067
[notice] signal process started
[notice] getrlimit(RLIMIT_NOFILE): 10240:1048576error就只剩真正出错的那几行。 - 顺带一个细节:
error_log stderr;是编译期默认(nginx -V里--error-log-path=stderr),这也是为什么nginx -t的错误直接打在终端上。 debug级别只有编译时带--with-debug才有输出,Ubuntu 包带了,源码版本文没带。- 每条日志都带
连接序号与上下文,排查时非常关键,实测一条完整记录长这样:1
22026/11/04 02:00:18 [error] 23186#23186: *31 limiting requests, excess: 3.986 by zone "req2",
client: 127.0.0.1, server: , request: "GET /req-file/page.txt HTTP/1.1", host: "127.0.0.1:8112"23186#23186是进程id#线程id,*31是这条连接上的请求计数。
- 原笔记只列到
-
pid
master 进程 pid 的存放位置。
nginx -s就是靠它找到该给谁发信号;systemd则靠单元文件里的PIDFile=。两者指向不一致时就会出现「nginx -s reload说kill() failed (2: No such process)」。 -
worker_rlimit_nofile
单个 nginx 进程允许打开的最大文件描述符数。实测它是真的改得动系统上限:
1
worker_rlimit_nofile 4096;
1
grep -i 'open files' /proc/$(pgrep -P $(cat /tmp/ngxp/logs/rl.pid) | head -1)/limits
1
Max open files 4096 4096 files
- 不写这行时,worker 继承的是系统默认:实测
Max open files 10240 1048576(软限 10240、硬限 1048576),error.log 里那句getrlimit(RLIMIT_NOFILE): 10240:1048576就是它。 - 原笔记说「可以用命令
ulimit -n 65535来设置」——那只影响启动 nginx 的那个 shell,写进/etc/security/limits.conf或 systemd 单元的LimitNOFILE=才持久。优先级上:worker_rlimit_nofile是 nginx 自己调setrlimit,比外部ulimit更可靠。 - 这条与
worker_connections的关系是:worker_connections不能超过 worker 进程的文件描述符上限,否则会出现「配置写了 10240 却实际接不住」。
- 不写这行时,worker 继承的是系统默认:实测
-
原笔记那句「worker_rlimit_nofile 达到上限时报 502」
这句要更正。实测撞上连接数上限时报的是 alert 级日志,且不一定给客户端 502:
1
[alert] 64 worker_connections are not enough while connecting to upstream
- 也就是说:先撞的往往是
worker_connections(events 段)而不是worker_rlimit_nofile;nofile不够时报文会变成open() ... failed (24: Too many open files)。两种都排查过才敢下结论。
- 也就是说:先撞的往往是
events
-
作用
指定 nginx 的工作模型(用哪种 IO 多路复用)与每个 worker 的连接数上限。
-
内容
1
2
3
4
5events {
use epoll; # Linux 上可省略,默认就是 epoll
worker_connections 1024; # Ubuntu 包默认写的是 768
multi_accept on; # 一次 accept 尽可能多的新连接
} -
use
-
作用:指定事件模型。实测不用写——Linux 上 nginx 自动选
epoll,error.log 里那句using the "epoll" event method就是它自己选的;Windows 版则是using the "select" event method。 -
可选模型(按平台可用性):
模型 说明 select标准模型,所有平台都有;Windows 版实测用的就是它 poll标准模型,比 select 略好 kqueueBSD/FreeBSD/macOS 的高效模型 epollLinux 2.6+ 的高效模型,本机默认 /dev/pollSolaris 专用 rtsigLinux 实时信号模型,早已不推荐 eventportSolaris 10 的事件端口 -
原笔记这张表里的
rtsig、/dev/poll留着当历史知识即可,写在自己的配置里反而可能报unknown event method。生产上建议整行删掉use,让 nginx 自己选。
-
-
worker_connections
- 定义每个 worker 能同时处理的连接数,官方默认值是 512(不是很多人以为的 1024);源码版自带的
nginx.conf里显式写了1024,Ubuntu 包写的是 768,这三份数字刚好是三个不同的口径。 - 官方对它的说明里有一句常被忽略:这个数字包含所有连接,包括与后端建立的连接,不只是客户端侧。所以反向代理场景下它天然「减半」,这才是原笔记「除以 4」这类经验公式的来源。
- 理论最大并发连接数 ≈
worker_processes × worker_connections。 - 实测更准的口径是:一个 worker 的并发上限同时受
worker_connections和文件描述符上限约束,nginx 启动时会打并且每个 TCP 连接至少占 1 个 fd,代理场景占 2 个。所以「1
[notice] getrlimit(RLIMIT_NOFILE): 10240:1048576
worker_connections设多大」的正确问法是「worker_rlimit_nofile给了多大」。 - 撞上限的真实表现(实测把
worker_connections设成 64,然后让反向代理自己转自己):客户端拿到 500。这条比「502」更常见,值得记住。1
2026/11/04 02:00:18 [alert] 23186#23186: *96 64 worker_connections are not enough while connecting to upstream
- 定义每个 worker 能同时处理的连接数,官方默认值是 512(不是很多人以为的 1024);源码版自带的
-
multi_accept
官方默认 off:关闭时 worker 每轮事件循环只 accept 一个新连接,开启后一次把就绪的连接全收完(
kqueue模型下这个参数被忽略)。Ubuntu 配置里就是注释掉的# multi_accept on;。
http
-
作用
最核心的模块,负责 HTTP 服务的所有属性;
server与upstream都是它的子块。 -
内容(Ubuntu 26.04 实测原文,去掉了注释)
1
2
3
4
5
6
7
8
9
10
11
12
13
14
15
16
17
18
19http {
include mime.types;
default_type application/octet-stream;
sendfile on;
tcp_nopush on;
types_hash_max_size 2048;
server_tokens build;
ssl_protocols TLSv1.2 TLSv1.3;
ssl_prefer_server_ciphers off;
access_log /var/log/nginx/access.log;
gzip on;
include /etc/nginx/conf.d/*.conf;
include /etc/nginx/sites-enabled/*;
} -
include
设定文件的 MIME 类型,映射表在
mime.types里(Ubuntu 那份实测 101 行,如text/plain txt;、application/json json;)。告诉 nginx 某扩展名该以什么类型响应。 -
default_type
没匹配到 MIME 时的兜底类型,默认
application/octet-stream,也就是浏览器直接下载。原笔记举的例子(没配 asp 环境时访问 asp 文件变成下载)现在没什么参考价值,但机制描述是对的。- 实测一个高频坑:响应类型是按 URI 的扩展名决定的,不是按磁盘上的文件名。
1
location /big { alias /tmp/ngx2/data/big.txt; }
因为 URI 是1
Content-Type: application/octet-stream
/big,没有扩展名,于是落到default_type;同一个文件走/root-combo/hello.txt时才是text/plain。这条直接解释了「gzip_types text/plain明明配了却看不到Content-Encoding: gzip」。
- 实测一个高频坑:响应类型是按 URI 的扩展名决定的,不是按磁盘上的文件名。
-
log_format 与 access_log
1
2
3
4
5log_format main '$remote_addr - $remote_user [$time_local] "$request" '
'$status $body_bytes_sent "$http_referer" '
'"$http_user_agent" "$http_x_forwarded_for"';
access_log /var/log/nginx/access.log main;- 顺序有硬要求:
log_format必须写在引用它的access_log之前,否则启动直接失败:1
[emerg] unknown log format "main" in /etc/nginx/nginx_test.conf:9
- 真实日志行长这样(本机实测):字段依次是:客户端地址、远程用户(
1
127.0.0.1 - - [04/Nov/2026:01:59:32 +0800] "GET /api/abc HTTP/1.1" 200 29 "-" "curl/8.18.0"
$remote_user,没认证就是-)、时间、请求行、状态码、发送给客户端的字节数、Referer、User-Agent、X-Forwarded-For。 - 原笔记那段示例里的
"_"应为"-"(Nginx 用连字符表示空值),Mozilla/5.0 (Macintosh; Intel Mac OSX 10 .10_ 2)是被 OCR 拆坏的旧 UA 串。 access_log off;能关;access_log path format buffer=32k flush=5s;能缓冲写;open_log_file_cache max=1000 inactive=20s;能避免每条日志都open()一次(高并发下这个系统调用很贵)。
- 顺序有硬要求:
-
sendfile / tcp_nopush / tcp_nodelay
1
2
3sendfile on;
tcp_nopush on;
tcp_nodelay on;sendfile on开启零拷贝式文件传输(内核直接把页缓存送到 socket,不经过用户态缓冲)。tcp_nopush只有在sendfile on时才有意义,作用是把响应头和数据攒成一个完整报文再发;tcp_nodelay则在 keep-alive 连接上禁用 Nagle,保证小报文及时发出。- 原笔记的
sendfle、tcp_ nopush、tcp_ nodelay都是 OCR 造成的错字(多个空格、少个字母),照抄会报unknown directive。 - Windows 版对
sendfile不生效(它的事件模型是select),这也是「Windows 版发静态文件慢」的原因之一。
-
keepalive_timeout
客户端空闲连接的保持时间,默认
75s,源码版配置里显式写65。设成0等于关闭长连接。配套的是keepalive_requests(一条长连接上最多处理多少个请求,默认 1000)。 -
gzip
1
2
3
4gzip on;
gzip_min_length 20;
gzip_comp_level 5;
gzip_types text/plain application/json;- 两个实测结论:
gzip_min_length(默认 20 字节)以下的响应不会压缩——16 字节的hello.txt没有Content-Encoding,301 字节的就有。- 压缩只对
gzip_types列出的类型生效,而类型又按 URI 扩展名判定(见上面default_type那条坑)。
text/html是永远参与压缩的,不用写进gzip_types;application/octet-stream默认不在名单里,也别手贱加进去。- 建议再加
gzip_vary on;,否则 CDN/代理可能把压缩版发给不支持的客户端。
- 两个实测结论:
-
client_max_body_size
请求体上限,默认 1m。实测设成 64 字节时:
1
2curl -s -o /dev/null -w '%{http_code}\n' --data-binary @b50.txt http://127.0.0.1:8090/body/
curl -s -o /dev/null -w '%{http_code}\n' --data-binary @b100.txt http://127.0.0.1:8090/body/1
2200
413- 上传文件报 413 就是这里,Django/Flask 自己的上限是第二道关卡,两边都要放行。
- 0 表示不限制。
-
server_tokens
控制
Server响应头里暴露多少信息,三种取值本机实测:1
2
3on -> Server: nginx/1.28.3
build -> Server: nginx/1.28.3 (Ubuntu) # Ubuntu 默认就是它
off -> Server: nginx- 生产建议
off。它写在http、server、location任一层都可以(实测放在location里也生效)。
- 生产建议
-
types_hash_max_size / server_names_hash
这两组是「哈希表容量」参数,Ubuntu 默认写
types_hash_max_size 2048;,server_names_hash_bucket_size注释掉(自动)。原笔记没提,但网上大量「必须手动调 server_names_hash」的文章需要更正:实测把server_names_hash_max_size压到 16、bucket_size压到 8,再放一个 45 字符的server_name,nginx -t和真实启动都不报错,nginx 会自己扩容。只有极老的版本才会报could not build up the server name "hash"。
server
-
作用
定义一个虚拟主机:监听哪些地址端口、认领哪些域名、出错给什么页面、日志写到哪里。
-
内容(Ubuntu 26.04 默认站点实测原文)
1
2
3
4
5
6
7
8
9
10
11
12
13
14
15
16
17
18
19
20
21server {
listen 80 default_server;
listen [::]:80 default_server;
server_name _;
root /var/www/html;
index index.html index.htm index.nginx-debian.html;
access_log /var/log/nginx/access.log;
charset utf-8;
error_page 500 502 503 504 /50x.html;
location = /50x.html {
root /usr/share/nginx/html;
}
location / {
try_files $uri $uri/ =404;
}
} -
listen
指定虚拟主机监听的地址与端口,可以写多次(IPv4 与 IPv6 各一条)。常见形式:
1
2
3
4
5
6
7listen 80; # 所有 IPv4 地址的 80
listen [::]:80; # IPv6
listen 127.0.0.1:8080; # 只绑回环
listen 80 default_server; # 没有任何 server_name 命中时归它
listen 8443 ssl; # 这个端口直接讲 TLS
listen 8080 reuseport; # 每个 worker 独立监听套接字(Linux)
listen 80 proxy_protocol; # 前面还有一层 LB,需要解析 PROXY 头default_server是绑在listen上的,不是绑在server_name上的,这一点很多人记错。同一端口最多只能有一个default_server,写两个会报duplicate default server。listen 8443 ssl与http2的写法在新版本里是分开的(http2 on;),老写法listen 443 ssl http2;在 1.25 之后会报the "http2" parameter of the "listen" directive is deprecated。本机 1.28.3 实测用的是listen 8443 ssl;+http2 on;。- 端口被占用时报的是这是「再起一个实例」时最常见的失败原因,先用
1
[emerg] bind() to 0.0.0.0:80 failed (98: Address already in use)
ss -ltnp找到占用者。
-
server_name 与匹配优先级(实测)
1
2
3
4
5
6server { listen 8092 default_server; server_name _; return 200 "default-server\n"; }
server { listen 8092; server_name foo.example.com; return 200 "exact-foo\n"; }
server { listen 8092; server_name www.foo.example.com; return 200 "exact-www-foo\n"; }
server { listen 8092; server_name .wild.example.com; return 200 "leading-dot-wildcard\n"; }
server { listen 8092; server_name ~^regex(?<num>[0-9]+)\.example\.com$; return 200 "regex num=$num\n"; }
server { listen 8092; server_name bar.example.com baz.example.com; return 200 "bar-or-baz\n"; }1
2
3for h in foo.example.com www.foo.example.com a.wild.example.com regex42.example.com bar.example.com other.test; do
printf '%-26s -> %s\n' "$h" "$(curl -s -H "Host: $h" http://127.0.0.1:8092/)"
done1
2
3
4
5
6foo.example.com -> exact-foo
www.foo.example.com -> exact-www-foo
a.wild.example.com -> leading-dot-wildcard
regex42.example.com -> regex num=42
bar.example.com -> bar-or-baz
other.test -> default-server- 优先级是:精确名 > 以
*/.开头的通配名(长的优先)> 正则(按书写顺序)>default_server。 - 前置点写法
.wild.example.com同时匹配wild.example.com本身和所有子域,这是官方推荐的省哈希写法。 - 正则名里可以用命名捕获
(?<num>...),捕获到的$num能在location/rewrite里用。 server_name匹配的是请求的Host头,不是 IP。所以curl http://127.0.0.1:8092/不带-H Host时命中的是default_server;本地测试多虚拟主机时,curl --resolve foo.example.com:8092:127.0.0.1比手写-H更接近浏览器行为。
- 优先级是:精确名 > 以
-
charset
给响应
Content-Type追加; charset=utf-8。只对charset_map里配了映射的字符集生效(koi8-r、utf-8等),所以写charset utf-8;是有效的。 -
access_log / error_log
在
server里可以覆盖全局的日志路径与格式。注意access_log里引用的格式名必须已经在http层用log_format定义过,否则就是那句unknown log format "main"。 -
error_page
1
2
3error_page 404 /404.html;
error_page 500 502 503 504 /50x.html;
location = /404.html { internal; }- 实测:请求一个不存在的 URI 时返回 404,响应体是
/tmp/ngx/html/404.html的内容(15 字节的not found page)。 internal的作用是「只允许内部跳转访问」,直接请求/404.html会得到 404,防止用户绕过。- 还能写
error_page 404 =200 /empty.gif;(改状态码)与error_page 404 = @fallback;(跳命名 location)。 - 原笔记把
error_log也列进 server 段并说「最后的 error 用于指定访问日志的输出格式」,那是笔误:error_log的第二个参数是级别,不是格式名。
- 实测:请求一个不存在的 URI 时返回 404,响应体是
-
root 与 index(server 级)
root在 server 级表示整台虚拟主机的 web 根,index定义默认首页文件名。要和本笔记后面location里的root/alias区分开——location里再写root会覆盖 server 级的值。原笔记那句「注意要和 locate {} 下面定义的区分开来」里的locate是location的 OCR 错字。
location
-
作用
nginx 里用得最多也最重要的块:负载均衡、反向代理、虚拟域名都挂在它上面。它按 URI 定位处理规则,支持前缀匹配、正则匹配和条件判断,因此能对动静页面分别处理。
-
六种匹配前缀
写法 含义 实测 =精确匹配,命中即停,不再继续找 location = /exact只吃/exact,/exact/不算^~匹配到该前缀后不再检查正则 ^~ /static/让/static/pic.jpg不被~* \.jpg$抢走~区分大小写的正则,捕获组可用 ~ ^/re/(?<id>[0-9]+)$→regex id=7~*不区分大小写的正则 ~* \.jpg$命中/a.JPG无前缀 普通前缀匹配,多个命中时取最长的那个 /pref/longer赢过/pref/@name命名 location,只能被 try_files/error_page内部跳转@fallback输出named fallback -
匹配优先级(实测结论)
nginx 的查找顺序是:
- 先记录最长的普通前缀匹配(记住但先不执行);
- 如果这个最长前缀带
=,直接用它; - 如果带
^~,也直接用它,跳过所有正则; - 否则按书写顺序逐个试正则,第一个命中的胜出;
- 正则都不命中,回到第 1 步记住的那个最长前缀。
实测配置(8088):
1
2
3
4
5
6
7
8location = /exact { return 200 "exact match\n"; }
location ^~ /static/ { alias /tmp/ngx/static/; }
location /pref/ { return 200 "prefix pref\n"; }
location /pref/longer { return 200 "longer prefix\n"; }
location ~ ^/re/(?<id>[0-9]+)$ { return 200 "regex id=$id\n"; }
location ~* \.jpg$ { return 200 "case-insensitive jpg\n"; }
location @fallback { return 200 "named fallback\n"; }
location /try { try_files $uri $uri/ @fallback; }实测结果:
1
2
3
4
5
6
7
8
9
10
11/exact -> exact match
/exact/ -> not found page # = 不吃 /exact/,落到 server 根再 404
/pref/longer -> longer prefix # 最长前缀赢
/pref/xxx -> prefix pref
/static/img/pic.txt -> jpg-real # ^~ 抢在正则前面,走 alias 拿到真实文件
/a.JPG -> case-insensitive jpg
/A.jpg -> case-insensitive jpg # ~* 不区分大小写
/re/123 -> regex id=123
/re/abc -> not found page # 正则没命中,也没有别的前缀规则
/try/nothing-here -> named fallback # try_files 兜底到 @fallback
/prefix-longest -> longest wins-
其中
/exact/和/re/abc这两条最能说明问题:没命中任何 location 规则时,请求落到 server 级root找文件,找不到就走error_page 404,于是客户端看到的是那个 15 字节的not found page,而不是 nginx 默认的 404 页。 -
一句话记忆:
=>^~> 正则(书写顺序)> 普通前缀(最长)。 -
「正则按书写顺序」是很多人踩坑的地方:两条正则都能命中时,谁写在前面谁赢,跟长度无关。
-
访问 nginx 本机目录下的文件
1
2
3
4location / {
root html;
index index.html index.htm;
}1
2
3location /static/ {
alias /var/static/;
}- 这两段是原笔记里唯一没被 OCR 弄坏的配置,写法是对的;但要补上最关键的一句区别:
root是「root + 完整 URI」;alias是「把 location 前缀整段替换掉」。
- 实测证据(同一个文件
lim.txt放在/tmp/ngx/html/下):1
location /limited2/ { root /tmp/ngx/html; } # 请求 /limited2/lim.txt
它把1
open() "/tmp/ngx/html/limited2/lim.txt" failed (2: No such file or directory)
limited2/也拼进去了;而直接请求/lim.txt(命中 server 级root /tmp/ngx/html)是 200。 - 用
alias时,location 和 alias 结尾的/要成对:location /static/ { alias /var/static/; }请求/static/img/pic.txt→/var/static/img/pic.txt(实测拿到jpg-real)。漏掉一边就会拼出/var/staticimg/pic.txt这种路径。 - 老 nginx 在「
alias+ 正则 location + URI 被 rewrite 改写」的组合下有目录穿越漏洞(1.28.3 的CHANGES顶部那条安全修复就是alias+ WebDAVCOPY/MOVE的缓冲区溢出),所以能用root就别用alias,非要alias就别在同一个 location 里做 rewrite。
- 这两段是原笔记里唯一没被 OCR 弄坏的配置,写法是对的;但要补上最关键的一句区别:
-
反向代理配置(Django runserver 场景)
1
2
3
4
5
6
7location / {
proxy_pass http://127.0.0.1:8000;
proxy_set_header Host $http_host;
proxy_set_header X-Real-IP $remote_addr;
proxy_set_header X-Forwarded-For $proxy_add_x_forwarded_for;
proxy_set_header X-Forwarded-Proto $scheme;
}- 原笔记这里写的是
proxy_set_header X-real-ip $remote_addr;和proxy_pass http://www.suyin.tech:8000;。头名大小写不敏感,X-real-ip能用但不规范,统一写X-Real-IP;proxy_pass指向公网域名再绕回本机是配置错误,本机跑就写127.0.0.1:8000。 $host与$http_host的实测差别,是这里最该记住的一条:Django 的1
2
3请求 Host: Foo.Example.com:1234
$host -> foo.example.com (小写、去端口)
$http_host -> Foo.Example.com:1234 (原样)ALLOWED_HOSTS要带端口、或者要做绝对 URL 拼接时,用$http_host才不会丢端口。
- 原笔记这里写的是
-
uwsgi 方式(Django 正式部署)
1
2
3
4location / {
include /etc/nginx/uwsgi_params;
uwsgi_pass suyin; # suyin 是 upstream 名字
}include建议写绝对路径,理由见「配置」一节里那条实测:相对路径是按配置文件所在目录解析的。- 本机对这条只做到「配置合法」这一层:
uwsgi_pass、scgi_pass、fastcgi_pass三条指令在 1.28.3 上都能通过nginx -t,且真实启动后能按各自协议去连后端,连不上时报客户端得到 502。本机没有装 uWSGI,因此「Django + uwsgi_pass 端到端跑通」这条没有实测,只验证到协议与配置层面;1
2[error] connect() failed (111: Connection refused) while connecting to upstream,
upstream: "uwsgi://127.0.0.1:8000"uwsgi://、fastcgi://这个前缀是判断走哪条协议链路的线索。 /etc/nginx/uwsgi_params的内容(实测前几行)就是把QUERY_STRING、REQUEST_METHOD、CONTENT_TYPE、CONTENT_LENGTH这些 CGI 风格变量喂给 uwsgi:1
2
3
4uwsgi_param QUERY_STRING $query_string;
uwsgi_param REQUEST_METHOD $request_method;
uwsgi_param CONTENT_TYPE $content_type;
uwsgi_param CONTENT_LENGTH $content_length;- 同目录还有一份现成的
/etc/nginx/proxy_params(204 字节),内容正好是四条常用头,直接include /etc/nginx/proxy_params;比手抄省事:1
2
3
4proxy_set_header Host $host$is_request_port$request_port;
proxy_set_header X-Real-IP $remote_addr;
proxy_set_header X-Forwarded-For $proxy_add_x_forwarded_for;
proxy_set_header X-Forwarded-Proto $scheme;- 注意第一行:新版 Ubuntu 配置用
$is_request_port$request_port来「客户端带了端口就保留端口」,比单纯写$host更稳。
- 注意第一行:新版 Ubuntu 配置用
静态资源与缓存
-
try_files
1
2
3
4
5
6
7
8
9location / {
try_files $uri $uri/ =404; # Ubuntu 默认站点就是这么写的
}
location /try {
try_files $uri $uri/ @fallback; # 兜底到命名 location
}
location /app/ {
try_files $uri $uri/ /index.html; # SPA 前端路由的标准写法
}- 参数是候选列表,按顺序试:文件 → 目录 → 内部跳转目标;最后一个可以写成
=code、=404或一个 URI。 - 实测
/try/nothing-here→named fallback,说明前两个候选都不存在时确实跳到了@fallback。 - SPA(Vue/React 打包产物)必须写
try_files $uri $uri/ /index.html;,否则刷新子路由就是 404。
- 参数是候选列表,按顺序试:文件 → 目录 → 内部跳转目标;最后一个可以写成
-
autoindex
1
location /dir/ { autoindex on; }
实测返回的是 nginx 自带的目录页 HTML:
1
2
3
4
5
6
7<html>
<head><title>Index of /dir/</title></head>
<body>
<h1>Index of /dir/</h1><hr><pre><a href="../">../</a>
<a href="a.txt">a.txt</a> 03-Nov-2026 16:00 3
</pre><hr></body>
</html>- 配套参数:
autoindex_exact_size off;(显示4.0K而不是字节数)、autoindex_localtime on;(显示本地时区)。 - 公网站点慎开,它等于把目录结构白送出去;真要当文件服务器用,配合
auth_basic或secure_link。
- 配套参数:
-
expires 与缓存头
1
location /exp/ { expires 1h; add_header X-Test hello; return 200 "cached\n"; }
1
2
3Expires: Tue, 03 Nov 2026 17:00:56 GMT
Cache-Control: max-age=3600
X-Test: helloexpires epoch(或off)实测得到的是「立刻过期」:1
2Expires: Thu, 01 Jan 1970 00:00:01 GMT
Cache-Control: no-cacheexpires会同时改Expires和Cache-Control两个头,别以为只写一个。- 静态资源的常见写法:
1
2
3
4
5location ~* \.(js|css|png|jpg|jpeg|gif|ico|svg|woff2)$ {
expires 30d;
add_header Cache-Control "public, immutable";
access_log off;
}
-
add_header 的两个坑(实测)
1
2
3
4
5
6
7
8
9
10server {
listen 8090;
add_header X-Srv server-level;
add_header X-Srv2 also-server-level always;
location /inherit/ {
add_header X-Loc location-level; # 只要这里出现 add_header……
return 200 "x\n";
}
}1
2
3
4GET /big -> X-Srv: server-level
X-Srv2: also-server-level
GET /inherit/ -> X-Loc: location-level # server 级的两条全部消失
GET /nosuch (404) -> X-Srv2: also-server-level # 只有带 always 的还在- 坑一:
add_header是「整组覆盖」而不是追加。子级一旦写了任意一条,父级的所有add_header都不再生效。想保留就得在子级重写一遍。 - 坑二:默认只对 2xx/3xx 响应生效。404、500 这类响应上你加的自定义头不会出现,必须写
always。 - 同一层里写多条是允许的(
X-Srv和X-Srv2都生效)。
- 坑一:
-
gzip 完整可用配置
1
2
3
4
5
6
7gzip on;
gzip_vary on;
gzip_min_length 1024; # 太小不值得压
gzip_comp_level 5; # 4~6 是常见甜区
gzip_proxied any;
gzip_types text/plain text/css application/json application/javascript
text/xml application/xml application/xml+rss text/javascript image/svg+xml;- 实测两条边界:
gzip_min_length 20时 16 字节的.txt不压、301 字节的压;URI 没有扩展名时类型落到application/octet-stream,不在gzip_types里就绝不压(哪怕只有 171 字节、哪怕gzip on)。 gzip_static on(需要--with-http_gzip_static_module,本机 Ubuntu 版编了)能直接发送预先压好的xxx.gz,比每次现压省 CPU。
- 实测两条边界:
-
proxy_cache(实测能命中)
1
2
3
4
5
6
7
8
9
10
11
12
13http {
proxy_cache_path /var/cache/nginx levels=1:2 keys_zone=zc:10m
max_size=1g inactive=60m use_temp_path=off;
}
location /cached/ {
proxy_pass http://127.0.0.1:8101;
proxy_cache zc;
proxy_cache_valid 200 1m;
proxy_cache_key "$scheme$request_method$host$request_uri";
add_header X-Cache $upstream_cache_status;
add_header X-Backend $upstream_addr;
}1
2
3第 1 次 X-Cache: MISS X-Backend: 127.0.0.1:8101
第 2 次 X-Cache: HIT
第 3 次 X-Cache: HIT- 缓存文件确实落盘了,实测路径
/tmp/ngxp/cache/2/ea/8f3c5689b9cc74234650eea93b35dea2(levels=1:2就是这两层目录名的由来)。 $upstream_cache_status的取值:MISS/HIT/EXPIRED/STALE/BYPASS/UPDATING/REVALIDATED/STRONG_MISS,把它加进响应头或日志是排查缓存问题的第一步。- 没开
proxy_cache的 location 上这个变量是空的——实测对照 location 的X-Cache就没有出现。 - 缓存会吞掉「按用户区分」的响应,所以带 Cookie 的动态接口要么
proxy_cache_bypass $http_cookie;,要么干脆别缓。
- 缓存文件确实落盘了,实测路径
反向代理指令详解
-
proxy_pass
1
2proxy_pass URL;
# 上下文:location、if in locationURL 可以是
http://host:port、http://upstream_name/,也可以是unix:/path/to.sock;协议写https://时 nginx 会把 HTTP 请求转成 HTTPS 发给上游(本机 Ubuntu 版编了http_ssl_module,能用)。- 带不带 URI 路径,行为完全不同,这是反向代理第一大坑。实测:
1
2location /api/ { proxy_pass http://127.0.0.1:8101/; } # 带 /
location /apinouri/ { proxy_pass http://127.0.0.1:8101; } # 不带1
2请求 /api/abc -> 上游收到 /abc (前缀被替换)
请求 /apinouri/abc -> 上游收到 /apinouri/abc (原样透传) - 正则 location 里不能给
proxy_pass带 URI,nginx -t直接拒绝,原文:正确写法是用1
2
3[emerg] "proxy_pass" cannot have URI part in location given by regular expression,
or inside named location, or inside "if" statement, or inside "limit_except" block
in /etc/nginx/nginx_probe.conf:73rewrite ... break先把 URI 改好,再proxy_pass不带路径:实测上游收到1
2
3
4location ~ ^/re-api/(.*)$ {
rewrite ^/re-api/(.*)$ /$1 break;
proxy_pass http://127.0.0.1:8101;
}/abc,与/api/那条等价。 proxy_pass里写变量时,nginx 不再在启动时解析域名,必须配resolver;否则运行时报客户端得到 502。变量写法的好处是「上游地址能在运行时变」,做动态网关时才需要。1
[error] nosuchhost.invalid could not be resolved (3: Host not found)
- 带不带 URI 路径,行为完全不同,这是反向代理第一大坑。实测:
-
proxy_set_header
1
2
3
4proxy_set_header Host $http_host;
proxy_set_header X-Real-IP $remote_addr;
proxy_set_header X-Forwarded-For $proxy_add_x_forwarded_for;
proxy_set_header X-Forwarded-Proto $scheme;- 继承规则是「整组覆盖」:
location里只要写了任意一条proxy_set_header,http/server层的那些就全部不生效。实测某个 location 只写了一条User-Agent ""时,Host回到默认的$proxy_host、X-Real-IP变成None。 - 把值设成空串等于删除这个头,实测:
1
proxy_set_header User-Agent "";
这是「抹掉某个客户端头」的标准做法,比1
User-Agent: None # 上游根本收不到 UA
proxy_hide_header(那是管响应头的)更常用。 $proxy_add_x_forwarded_for的语义实测:客户端已带X-Forwarded-For: 203.0.113.7时,上游收到203.0.113.7, 127.0.0.1;客户端没带时就是127.0.0.1。也就是说它是「追加本机 IP」,不是覆盖。- 默认就有的两条:
Host: $proxy_host、Connection: close。
- 继承规则是「整组覆盖」:
-
proxy_method
1
proxy_method GET; # 上下文:http、server、location
实测客户端用
POST打/m/,上游收到的是 GET:1
curl -s -X POST -d 'a=1' http://127.0.0.1:8089/m/
1
backend 8101 /m/
- 原笔记说「客户端发来的 GET 请求在转发时方法改为 POST」,方向讲反了:它是无条件把转发方法改成指定值,不管客户端原来是什么。生产上几乎不该用——把 POST 变 GET 会丢请求体语义,把 GET 变 POST 会破坏缓存与幂等。
-
proxy_http_version
1
2proxy_http_version 1.1;
proxy_set_header Connection "";- 默认 1.0,实测上游请求行就是
HTTP/1.0、Connection: close;改完是HTTP/1.1。 - 两条必须一起写:只改版本不清
Connection,nginx 仍会发Connection: close,上游连接池(keepalive)和 WebSocket 都建不起来。
- 默认 1.0,实测上游请求行就是
-
proxy_hide_header / proxy_pass_header
1
2
3proxy_hide_header X-Pad;
proxy_hide_header X-Powered-By;
proxy_pass_header Server; # 允许转发默认被隐藏的头- nginx 默认就不转发上游的
Date、Server、X-Pad、X-Accel-*这几组头。实测上游(Pythonhttp.server)明明发了X-Pad: browser,客户端侧grep -c x-pad是 0——不需要额外配置。 - 于是
proxy_hide_header的真实用途是「再隐藏一个默认会被转发的头」,比如后端吐的X-Powered-By。 proxy_pass_header反过来把默认隐藏的头放出来。实测proxy_pass_header Server;之后客户端看到的仍是Server: nginx/1.28.3——Server头是 nginx 自己重写的,不是简单转发,这条放了也没用。- 实测隐藏两个头的效果:
1
location /hide2/ { proxy_pass http://127.0.0.1:8101; proxy_hide_header X-Pad; proxy_hide_header Content-Type; }
1
2(对照默认)Server: nginx/1.28.3 + Content-Type: text/plain
/hide2/ Server: nginx/1.28.3 # Content-Type 也被抹掉了- 顺带一条真实告警:上游把
Server头发了两遍时,nginx 会忽略后一个并记录1
2[warn] upstream sent duplicate header line: "Server: backend-8101",
previous value: "Server: BaseHTTP/0.6 Python/3.14.4", ignored while reading response header from upstream
- 顺带一条真实告警:上游把
- nginx 默认就不转发上游的
-
proxy_pass_request_body / proxy_pass_request_headers
1
2
3proxy_pass_request_body off;
proxy_set_header Content-Length ""; # 必须一起清掉,否则上游会等 body
proxy_pass_request_headers off; # 注意是复数 headers- 原笔记把指令名写成
proxy_pass_request_header(少一个 s),照抄会报unknown directive。 - 实测
proxy_pass_request_body off时,nginx 不会顺手把方法改成 GET:上游 Python 服务没实现do_POST,直接回了要改方法得再配一条1
Error code: 501 Message: Unsupported method ('POST').
proxy_method GET;。这个组合的正当用途是「只探路径不传内容」,比如把 POST 转成一次无体的健康检查。 proxy_pass_request_headers off之后上游收不到任何客户端请求头。实测同一请求(带User-Agent: TestUA/9和Cookie: a=1)在开与关两种配置下上游看到的分别是:也就是说这个开关只影响「客户端头要不要透传」,nginx 自己那两条默认头(1
2
3
4
5
6
7
8
9
10# proxy_pass_request_headers off
GET /nohdr/hdrs HTTP/1.0
Host: 127.0.0.1:8101 # 只剩 nginx 自己加的默认 Host(= $proxy_host)
User-Agent: None
Cookie: 不在列表里,同样没收到
# 正常代理
GET /hdrs/hdrs HTTP/1.0
Host: 127.0.0.1 # 被 proxy_set_header Host $host 改过
User-Agent: TestUA/9Host: $proxy_host、Connection: close)仍然照发。
- 原笔记把指令名写成
-
proxy_redirect
1
2proxy_redirect [ default | off | redirect replacement ];
# 默认 default;上下文:http、server、location上游返回 301/302 时,
Location头里往往是内网地址,浏览器拿到后根本访问不到。proxy_redirect就是改写这个头。实测三种写法(上游 302 的Location是http://127.0.0.1:8102/two/some/uri/):1
2
3location /redir/ { proxy_pass http://127.0.0.1:8102; proxy_redirect http://127.0.0.1:8102/two/ /one/; }
location /redirdef/ { proxy_pass http://127.0.0.1:8102; proxy_redirect default; }
location /rediroff/ { proxy_pass http://127.0.0.1:8102; proxy_redirect off; }1
2
3/redir/ -> Location: http://127.0.0.1:8089/one/some/uri/
/redirdef/ -> Location: http://127.0.0.1:8089/two/some/uri/
/rediroff/ -> Location: http://127.0.0.1:8102/two/some/uri/- 第一条说明 replacement 省略主机名时会用请求的 Host 补全(
/one/...变成http://127.0.0.1:8089/one/...),原笔记「可以省略 replacement 参数的主机名部分,这时候用虚拟主机名填充」这句是对的。 - 第二条说明
default只替换scheme://host:port,路径原样保留;原笔记里那段「proxy_redirect default与显式写法等效」的示例(location /+proxy_pass http://upstream:port/two/)在proxy_pass不带 URI 时并不等效,实测就是上面这样。 off完全不改写,客户端拿到内网地址——只有在你确认上游返回的是公网 URL 时才用。
- 第一条说明 replacement 省略主机名时会用请求的 Host 补全(
-
proxy_next_upstream
1
2
3proxy_next_upstream [ error | timeout | invalid_header | http_500 | http_502
| http_503 | http_504 | http_404 | non_idempotent | off ];
# 默认 error timeout;上下文:http、server、location- 语义:命中列出的条件时换下一台上游重试同一个请求。实测
upstream poolnext { server 8102; server 8101; }+error timeout http_500:1
2
38102 对 /next/boom 返回 500
客户端实际收到 -> backend 8101 /next/boom (200)
error.log -> upstream server temporarily disabled while reading response header from upstream - 写成
off时同一请求直接把 500 交给客户端:1
/off/boom -> 500
- 默认值
error timeout不含http_500,所以后端「活着但报错」时是不会切换的,必须显式加。 - 非幂等请求默认不重试。官方
CHANGES里 1.9.13 那条原文是:「non-idempotent requests (POST, PATCH) are no longer passed to the next server by default if a request has been sent to a backend; thenon_idempotentparameter of theproxy_next_upstreamdirective explicitly allows retrying such requests.」——也就是说请求已经发出去之后,POST/PATCH 即使遇到 error/timeout 也不会换后端重试,必须显式写non_idempotent才会。这条能避免重复下单、重复扣款。 - 原笔记那句「
off关闭功能,只要一出错就选择另外一台上游再次出发」把off的含义讲反了:off是完全不换,一出错就把错误交给客户端。
- 语义:命中列出的条件时换下一台上游重试同一个请求。实测
-
超时与缓冲
1
2
3
4
5
6
7
8proxy_connect_timeout 5s; # 与上游建连的超时,默认 60s
proxy_send_timeout 60s; # 向上游写请求的超时
proxy_read_timeout 60s; # 等上游响应的超时(Django 慢接口最常调的就是它)
proxy_buffering on; # 默认开
proxy_buffer_size 8k; # 存响应头的缓冲区
proxy_buffers 8 32k;
proxy_busy_buffers_size 64k;
proxy_temp_path /var/lib/nginx/proxy; # 编译期默认值,见 nginx -Vproxy_read_timeout到点报 504 Gateway Timeout,proxy_connect_timeout到点报 502——这两个状态码能帮你区分「连不上」和「连上了但没回」。- 关闭缓冲(
proxy_buffering off;)是 SSE/流式下载的必要条件,否则 nginx 会攒够一块才发给客户端。 - 大文件下载或慢客户端场景,
proxy_buffering off+proxy_request_buffering off能显著降低内存与首字节延迟。
upstream
-
作用
负责负载均衡的模块:先把一组后端服务器声明成一个名字,再在
proxy_pass、uwsgi_pass、fastcgi_pass里按名字调用。 -
内容
1
2
3
4
5
6
7
8upstream suyin {
ip_hash;
server 10.11.0.1:8080;
server 10.11.0.2:8080 down;
server 10.11.0.3:8080 max_fails=3 fail_timeout=20s;
server 10.11.0.4:8080 backup;
keepalive 32;
}- 名字(这里是
suyin)可以随便取,后面直接调用。 upstream块里只能写server和这些算法/参数指令,写别的会报错;server的地址可以是IP:端口、域名:端口、unix:/path.sock,也可以只写localhost:8080。
- 名字(这里是
-
调度算法一览(本机实测分布)
指令 含义 实测 (不写) 轮询, weight调权8 次 4:4; weight=3对 1 时 12 次 10:2ip_hash按客户端 IP 哈希 同 IP 6/6、10/10 固定一台 hash key [consistent]按自定义 key 哈希; key里可用变量hash $request_uri让/urihash/a、/b、/c各自稳定;consistent版把同 IP 映射到了另一台least_conn优先当前活跃连接最少的 串行 6 次 3:3 random [策略]随机;可跟 least_time等random two8 次全落一台(后端太快,选不出差别)least_time按「最近响应时间 + 活跃连接」选 1.7.5+ 提供,本机可用 sticky cookie name需要商业版 Nginx Plus,开源版没有 写了会 unknown directive- 原笔记列的
fair属于第三方模块,开源版确实没有;url_hash现在就是hash $request_uri,不需要额外装包。 - 同一块里写两种算法时,
nginx -t能过,启动会打[warn] load balancing method redefined,以最后写的为准(实测ip_hash; least_conn;之后ip_hash完全失效)。
- 原笔记列的
-
server 的可用参数
1
2server address [weight=1] [max_fails=1] [fail_timeout=10s]
[backup] [down] [route=name] [resize=128] [max_conns=0];参数 默认 说明 weight1 权值,平滑加权轮询用 max_fails1 在 fail_timeout窗口内允许失败几次,超过就标记不可用fail_timeout10s 失败计数窗口,同时也是「标记不可用」的暂停时长 backup— 只有非 backup 全挂/全忙才用;与 ip_hash、hash不兼容,实测[emerg] balancing method does not support parameter "backup"down— 主动摘除,参与 backup语义;与任何算法都能共存route/resize— 配合 hash ... consistent与sticky route用max_conns0(不限) 该后端并发连接上限;实测本机后端太快测不出效果 -
keepalive(上游连接复用)
1
2
3
4
5
6
7
8
9
10upstream backend {
server 127.0.0.1:8101;
keepalive 32; # 每个 worker 与上游保持的空闲连接数
}
location / {
proxy_pass http://backend;
proxy_http_version 1.1; # 必须
proxy_set_header Connection ""; # 必须
}keepalive是「空闲连接池」而不是「最大连接数」,官方文档特别强调这点;它必须配合proxy_http_version 1.1+ 清空Connection头,否则每条请求还是 HTTP/1.0 短连接,池子建不起来。keepalive_requests(默认 1000)与keepalive_timeout(默认 60s)也能写在upstream里,用于控制与上游的复用强度。
HTTPS 与 HTTP/2
-
一份能跑的最小 HTTPS 配置(实测)
1
2
3
4
5
6
7
8
9
10
11
12
13
14
15
16
17server {
listen 8443 ssl;
http2 on; # 1.25 起的写法,不要再写 listen ... http2
server_name localhost;
ssl_certificate /etc/nginx/certs/server.crt;
ssl_certificate_key /etc/nginx/certs/server.key;
ssl_protocols TLSv1.2 TLSv1.3;
ssl_ciphers HIGH:!aNULL:!MD5;
ssl_session_cache shared:SSL:10m;
ssl_session_timeout 10m;
ssl_prefer_server_ciphers off;
location / {
return 200 "tls ok: protocol=$ssl_protocol cipher=$ssl_cipher\n";
}
}实测输出:
1
2tls ok: protocol=TLSv1.3 cipher=TLS_AES_256_GCM_SHA384
negotiated http_version = 2- 用
curl -sk -o /dev/null -w '%{http_version}\n'验证 HTTP/2 协商成功;加--tls-max 1.2时也能连上(说明ssl_protocols两条都生效)。 - 用 http 打 https 端口会得到 400 和一句明确的原因:
1
400 The plain HTTP request was sent to HTTPS port
- 不带
-k时 curl 报rc=60(证书校验失败),自签证书是必然结果。
- 用
-
自签证书怎么生成(实测)
1
2
3
4openssl req -x509 -newkey rsa:2048 -nodes -days 365 \
-keyout server.key -out server.crt \
-subj "/C=CN/ST=ZJ/L=HZ/O=Loong/OU=Dev/CN=localhost" \
-addext "subjectAltName=DNS:localhost,IP:127.0.0.1"-addext subjectAltName不能省。本机第一版没加,openssl x509 -ext subjectAltName回的是No extensions in certificate——现代浏览器和 curl 都只认 SAN,不认 CN,缺 SAN 的证书即使点了「继续访问」也可能被直接拒。-nodes表示私钥不加密(否则 nginx 启动要交互输口令,systemd 里会卡死)。- Debian 系还预置了一份「snakeoil」自签证书,
/etc/nginx/snippets/snakeoil.conf里两行ssl_certificate/ssl_certificate_key指向/etc/ssl/certs/ssl-cert-snakeoil.pem与/etc/ssl/private/ssl-cert-snakeoil.key,测试环境直接include snippets/snakeoil.conf;就能起 https。
-
正式证书与 HTTP→HTTPS 跳转
1
2
3
4
5server {
listen 80 default_server;
server_name suyin-blog.cn;
return 301 https://$host$request_uri;
}- 实测
return 301 /target;时 nginx 会把相对路径补成绝对 URL 再发出去:所以1
2HTTP/1.1 301 Moved Permanently
Location: http://127.0.0.1:8095/targetreturn 301 https://$host$request_uri;这种写法是可靠的。 - Let’s Encrypt 的证书用
certbot --nginx自动签发与续期,它会往sites-enabled里写listen 443 ssl与include /etc/letsencrypt/options-ssl-nginx.conf。
- 实测
-
HTTP/3(QUIC)
1
2
3
4listen 443 quic reuseport;
listen 443 ssl;
http3 on;
add_header Alt-Svc 'h3=":443"';- 本机
nginx -V里确实带--with-http_v3_module,配置能通过语法检查;但 WSL2 的 UDP 转发与 QUIC 握手不稳定,端到端没有实测成功,这里只作为写法记录。要验证得用curl --http3或浏览器 DevTools 看h3。
- 本机
-
TLS 相关的发行版默认值(实测原文)
1
2ssl_protocols TLSv1.2 TLSv1.3; # Dropping SSLv3 (POODLE), TLS 1.0, 1.1
ssl_prefer_server_ciphers off; # Don't force server cipher order.- Ubuntu 26.04 的默认配置里就这两行,注释写得很明白:SSLv3(POODLE)、TLS 1.0/1.1 已被剔除。原笔记完全没提 https,这块属于必须补上的内容。
WebSocket 转发与 map
-
为什么 WebSocket 需要三件套
WebSocket 握手是一个「带
Upgrade: websocket的 HTTP 请求 + 之后切换成裸 TCP 流」。而 nginx 到上游默认是 HTTP/1.0 +Connection: close(实测过),协议切不过去。所以必须:1
2
3
4
5
6
7location /ws/ {
proxy_pass http://127.0.0.1:8000;
proxy_http_version 1.1;
proxy_set_header Upgrade $http_upgrade;
proxy_set_header Connection $connection_upgrade; # 来自 map
proxy_read_timeout 3600s; # 长连接别被超时掐断
} -
map 指令(实测)
map在http段里定义「根据一个变量的值给另一个变量赋值」:1
2
3
4map $http_upgrade $connection_upgrade {
default upgrade;
'' close;
}实测两种输入:
1
2curl -s http://127.0.0.1:8090/map/
curl -s -H 'Upgrade: websocket' http://127.0.0.1:8090/map/1
2upgrade=[] conn=[close]
upgrade=[websocket] conn=[upgrade]- 逻辑就是:客户端没发
Upgrade头时Connection置为close(普通请求照常工作),发了就置为upgrade(放行握手)。这正是「一个 location 同时服务 HTTP 和 WebSocket」的标准做法。 map的匹配规则支持精确串、~ 正则、~* 不区分大小写、hostnames通配,default是兜底。顺带一提,「用~/~*前缀表示大小写敏感性」这个约定就是 1.0.4 那次改动定下来的(CHANGES原文可查)。- 另一个常见用法是按 UA 分流:实测
1
2
3
4map $http_user_agent $is_mobile {
default 0;
~*(Mobile|Android|iPhone|iPad) 1;
}if ($http_user_agent ~* Mobile)的坑同样适用于这里:UA 串里必须真的出现Mobile。本机用Mozilla/5.0 (iPhone)测试时命中的是桌面分支,补成Mozilla/5.0 (iPhone; CPU iPhone OS 17_0 like Mac OS X) Mobile/15E148才走移动端。
- 逻辑就是:客户端没发
-
只给 WebSocket 用
Connection: upgrade也行如果这个 location 只服务 WebSocket,可以直接写死:
1
2proxy_set_header Upgrade websocket;
proxy_set_header Connection upgrade;但一旦同一个 location 还要处理普通 HTTP 请求,就必须用上面的
map,否则普通请求会带上非法的Connection: upgrade。
限流、访问控制与鉴权
-
先记一条最容易踩的规则:这些指令对
return型 location 不生效nginx 处理请求要依次经过若干阶段:
1
2
3
4post-read → server-name → rewrite → post-rewrite
→ preaccess(limit_req / limit_conn)
→ access(auth_basic / allow / deny)
→ try-files → content(静态文件 / proxy_pass / fastcgi …)return是在 rewrite 阶段就把请求终结掉的,所以后面的 preaccess 与 access 阶段根本不会执行。实测同一个 location 只把内容来源换成静态文件,行为立刻不同:1
2
3
4
5
6location /basic-return/ { auth_basic "r"; auth_basic_user_file /x/.htpasswd; return 200 "return-authed\n"; }
location /basic-file/ { auth_basic "r"; auth_basic_user_file /x/.htpasswd; }
location /deny-return/ { allow 10.0.0.0/8; deny all; return 200 "return-allowed\n"; }
location /deny-file/ { allow 10.0.0.0/8; deny all; }
location /limited/ { limit_req zone=perip burst=3 nodelay; return 200 "ok\n"; }
location /limited2/ { limit_req zone=perip2 burst=3 nodelay; root /tmp/ngx/html; }1
2
3
4
5
6
7
8
9
10auth_basic + return 无凭证 -> 200 "return-authed" # 完全没拦
auth_basic + 静态文件 无凭证 -> 401,带 WWW-Authenticate: Basic realm="r"
auth_basic + 静态文件 带凭证 -> 200 真实文件内容
auth_basic + 静态文件 错密码 -> 401
allow/deny + return 只允许 10/8,本机访问 -> 200 "return-allowed" # 没拦
allow/deny + 静态文件 只允许 10/8,本机访问 -> 403
limit_req + return 12 并发 -> 全 200
limit_req + 静态文件 12 并发 -> 5 个 200 + 7 个 503- 换句话说:
return只能用来做「直接响应」,不能指望它配合鉴权、限流、访问控制。测试时也别用return的 location 去验证限流有没有生效,会得到「限流没用」的错误结论(我本人就在这上面翻过一次)。 proxy_pass型 location 走的是 content 阶段,auth_basic、allow/deny、limit_req都正常生效。
- 换句话说:
-
limit_req(按请求速率限流)
1
2
3
4
5
6
7
8
9http {
limit_req_zone $binary_remote_addr zone=perip:10m rate=2r/s;
}
location / {
limit_req zone=perip burst=5 nodelay;
limit_req_status 429; # 默认是 503,改成 429 更语义化
limit_req_log_level warn; # 默认是 error
}$binary_remote_addr是「二进制的客户端 IP」,IPv4 固定 4 字节,比$remote_addr字符串省内存;10m的共享内存大约能存 16 万个 IPv4 地址。rate=2r/s是「每秒放行 2 个」,burst=5允许突发排队,nodelay表示排队的那些不真的等待、直接放行,超出的返回 503。- 实测拒绝时的日志原文:
1
2[error] limiting requests, excess: 3.986 by zone "req2", client: 127.0.0.1,
request: "GET /req-file/page.txt HTTP/1.1"excess就是「超出速率多少」,调burst时看这个数字最直观。
-
limit_conn(按并发连接限流)
1
2
3
4
5
6
7http {
limit_conn_zone $binary_remote_addr zone=conc:10m;
}
location /download/ {
limit_conn conc 2;
limit_conn_status 429;
}- 与
limit_req的区别:一个管速率,一个管同时在进行的连接数,防下载/长连接场景要用后者。 - 实测诚实记录:
limit_conn conc 2配 6 路并发请求(每个响应只有 17 字节、瞬间完成)全部返回 200——因为并发窗口太短,任何时刻活跃连接数没超过 2。要复现 503/429 得用慢后端或大文件。
- 与
-
auth_basic(HTTP 基础认证)
1
2
3
4# 生成密码文件(apr1 = MD5-crypt,OpenSSL 就能做,不必装 apache2-utils)
printf 'probe:' > /etc/nginx/.htpasswd
openssl passwd -apr1 '<你的密码>' >> /etc/nginx/.htpasswd
chmod 644 /etc/nginx/.htpasswd1
2
3
4
5location /admin/ {
auth_basic "secret-realm";
auth_basic_user_file /etc/nginx/.htpasswd;
proxy_pass http://127.0.0.1:8000;
}实测:
1
2
3无凭证 -> 401,响应头 WWW-Authenticate: Basic realm="secret-realm"
带凭证 -> 200 正常内容
错密码 -> 401- 权限给 644 就够(worker 以
www-data读它),别给 600 否则报open() failed (13: Permission denied)。 auth_basic off;能在子 location 里关掉继承来的认证。- 基础认证是每次请求都要求凭证,配合 HTTPS 才不会明文传密码;生产上更常见的是用它保护
stub_status、/admin这类内部入口。
- 权限给 644 就够(worker 以
-
allow / deny(IP 白名单)
1
2
3
4
5
6location /internal/ {
allow 127.0.0.1;
allow 10.0.0.0/8;
deny all;
proxy_pass http://127.0.0.1:8000;
}- 规则自上而下匹配,命中即止,所以
allow要写在deny all前面。 - 实测本机访问
allow 10.0.0.0/8; deny all;的静态 location → 403。 - 注意它匹配的是
$remote_addr,如果前面还有一层 CDN/负载均衡,$remote_addr是那一层的地址,此时要用realip模块(set_real_ip_from+real_ip_header X-Forwarded-For)把真实 IP 还原出来,否则白名单形同虚设。
- 规则自上而下匹配,命中即止,所以
-
stub_status(最简监控)
1
2
3
4
5location /stub {
stub_status;
allow 127.0.0.1;
deny all;
}1
2
3
4Active connections: 1
server accepts handled requests
15 15 15
Reading: 0 Writing: 1 Waiting: 0- 三行数字依次是「累计接受连接数 / 成功握手数 / 已处理请求数」,第二行三个数不相等就说明有连接被丢弃或握手失败过。
Reading/Writing/Waiting分别是「正在读请求头/体」「正在发响应」「保持空闲」。- 必须加访问控制,否则等于把流量指标公开。
-
secure_link 与 limit_except(补充)
1
2
3
4
5
6
7
8
9
10location /files/ {
secure_link $arg_md5,$arg_expires;
secure_link_md5 "secret$uri$arg_expires";
if ($secure_link = "") { return 403; }
if ($secure_link = "0") { return 410; }
}
location /api/ {
limit_except POST PUT { deny all; } # 只放行写操作
}limit_except里写的 location 内容不能再用proxy_pass带 URI,理由见前面那条[emerg] "proxy_pass" cannot have URI part ... inside "limit_except" block。
rewrite 与 if
-
rewrite 的四种 flag(实测)
1
2
3
4
5
6
7location /rw/ { rewrite ^/rw/([a-z]+)$ /pref/$1 last; }
location /r301 { return 301 /target; }
location /r302 { return 302 /target; }
location /rw301 { rewrite ^/rw301$ /target permanent; }
location /rw302 { rewrite ^/rw302$ /target; }
location /loop { rewrite ^/loop$ /loop2; }
location /loop2 { rewrite ^/loop2$ /loop; }1
2
3
4
5
6
7GET /rw/longer -> longer prefix # last:重新走一遍 location 匹配
GET /rw/xxx -> prefix pref
GET /r301 -> 301 Location: http://127.0.0.1:8095/target
GET /r302 -> 302 Location: http://127.0.0.1:8095/target
GET /rw301 -> 301 Location: http://127.0.0.1:8095/target # permanent
GET /rw302 -> 200 (客户端看不到跳转) # 无 flag = 内部继续
GET /loop -> 500flag 行为 (不写) 改完 URI 后继续执行同一 location 里后面的 rewrite,最终按新 URI 找内容 last停止当前 rewrite 集合,用新 URI 重新匹配 location(最常用) break停止当前 location 的 rewrite,直接用当前 URI 找内容,不再重新匹配 location redirect返回 302,只在「替换的是完整 URI」时可用 permanent返回 301 - 死循环有保护:rewrite 链超过 10 次就中断,日志原文客户端得到 500。看到 500 且日志里有
1
[error] rewrite or internal redirection cycle while processing "/loop2"
redirection cycle,先怀疑last与try_files互相指。
- 死循环有保护:rewrite 链超过 10 次就中断,日志原文
-
if 的真实用法与陷阱
1
2
3
4location /mob {
if ($http_user_agent ~* Mobile) { return 200 "mobile\n"; }
return 200 "desktop\n";
}1
2UA 含 Mobile -> mobile
UA 是桌面串 -> desktop- nginx 作者本人说过「if is evil」,指的是
if块里放proxy_pass、root、try_files这类内容生成指令时行为不可预期。安全用法只有两种:if里只放return或rewrite,或者只用来设置一个变量再交给map/limit之类判断。 - 实测印证了这条:
if里写return完全正常(上面就是),但if ($http_user_agent ~* Mobile)里写proxy_pass http://...;就可能撞上「继承的 location 配置失效」的老问题。 - 需要「按条件选后端」时,改用
map生成变量再喂给proxy_pass,比if干净得多。 - 正则比较的写法是
~(区分大小写)与~*(不区分),右边不要加引号:1
2if ($http_user_agent ~* "Mobile") { ... } # 老写法,能用但没必要
if ($http_user_agent ~* (Mobile|iPhone)) { ... }
- nginx 作者本人说过「if is evil」,指的是
-
变量与
set1
2set $upstream_backend http://127.0.0.1:8101;
proxy_pass $upstream_backend; # 变量形式:必须配 resolver,且失去启动期校验- 实测
proxy_pass用变量指向一个解析不了的域名时报文是返回 502。变量代理很灵活,但代价是1
[error] nosuchhost.invalid could not be resolved (3: Host not found)
nginx -t阶段发现不了任何地址问题。
- 实测
Django 项目部署(把前面几节串起来)
-
场景一:
runserver直接反代(开发/演示)1
2
3
4
5
6
7
8
9
10
11
12
13
14
15
16
17
18
19
20
21
22
23
24
25
26
27
28
29
30
31
32upstream django_app {
server 127.0.0.1:8000;
keepalive 16;
}
server {
listen 80;
server_name suyin-blog.cn;
access_log /var/log/nginx/django.access.log main;
error_log /var/log/nginx/django.error.log warn;
location /static/ {
alias /var/www/django/static/;
expires 30d;
access_log off;
}
location /media/ {
alias /var/www/django/media/;
}
location / {
proxy_pass http://django_app;
proxy_http_version 1.1;
proxy_set_header Connection "";
include /etc/nginx/proxy_params;
proxy_connect_timeout 5s;
proxy_read_timeout 60s;
client_max_body_size 20m;
}
}- 这套配置的每一块本文都有对应实测:
upstream + keepalive见「upstream」,alias与expires见「静态资源」,proxy_params与client_max_body_size见「http」与「反向代理指令」。 - 本机用 8101 端口那个 Python HTTP 服务代替
runserver跑过同样的结构,代理链路与头部转发均符合预期;Django 本身这条链路没有端到端实测(本机没起 Django 项目),ALLOWED_HOSTS、SECURE_PROXY_SSL_HEADER这些 Django 侧配置请以 Django 官方文档为准。 runserver是单线程开发服务器,只适合演示;正式部署走场景二。
- 这套配置的每一块本文都有对应实测:
-
场景二:uWSGI(原文那两段的正确写法)
uwsgi.ini:1
2
3
4
5
6
7[uwsgi]
module = myproject.wsgi:application
master = true
processes = 4
socket = 127.0.0.1:8001
vacuum = true
chmod-socket = 660nginx 侧:
1
2
3
4
5
6
7
8upstream suyin {
server 127.0.0.1:8001;
}
location / {
include /etc/nginx/uwsgi_params;
uwsgi_pass suyin;
}- 原笔记这里只有
include uwsgi_params; uwsgi_pass suyin;两行,缺了「suyin必须先在http里用upstream声明」这一层关系,读者照抄会报no host in upstream。 socket而不是http:uwsgi 走的是自己的二进制协议,nginx 用uwsgi_pass讲它;如果 uwsgi 配成http-socket,nginx 这边就该换成proxy_pass。- 本机对这条只验证到「配置合法 + 协议链路会去连 8001」,实测连不上时报返回 502。未装 uWSGI,因此「Django 经 uwsgi_pass 正常出页」这条没有实测。
1
2[error] connect() failed (111: Connection refused) while connecting to upstream,
upstream: "uwsgi://127.0.0.1:8000" - 现在更常见的替代是 Gunicorn +
proxy_pass(gunicorn myproject.wsgi监听 8000,nginx 侧就是场景一那套),配置更简单,也是本文其余部分实测过的链路。
- 原笔记这里只有
-
场景三:HTTPS + 静态资源 + 反代一条龙
1
2
3
4
5
6
7
8
9
10
11
12
13
14
15
16
17
18
19
20
21
22
23
24
25
26
27
28
29
30
31server {
listen 80;
server_name suyin-blog.cn;
return 301 https://$host$request_uri;
}
server {
listen 443 ssl;
http2 on;
server_name suyin-blog.cn;
ssl_certificate /etc/letsencrypt/live/suyin-blog.cn/fullchain.pem;
ssl_certificate_key /etc/letsencrypt/live/suyin-blog.cn/privkey.pem;
ssl_protocols TLSv1.2 TLSv1.3;
ssl_session_cache shared:SSL:10m;
gzip on;
gzip_types text/css application/javascript application/json image/svg+xml;
location /static/ { alias /var/www/django/static/; expires 30d; }
location /media/ { alias /var/www/django/media/; expires 7d; }
location / {
proxy_pass http://127.0.0.1:8000;
proxy_http_version 1.1;
proxy_set_header Host              $http_host;
proxy_set_header X-Real-IP         $remote_addr;
proxy_set_header X-Forwarded-For   $proxy_add_x_forwarded_for;
proxy_set_header X-Forwarded-Proto $scheme;
}
}- 这里
X-Forwarded-Proto $scheme是让后端知道「客户端其实走的是 https」,Django 侧要配合SECURE_PROXY_SSL_HEADER;本机 TLS 终结部分实测过(protocol=TLSv1.3、http_version=2),Django 侧未实测。
- 这里
常见报错与排查
-
语法与启动类
现象 / 日志原文 原因与处理 [emerg] "server" directive is not allowed here in ...:7层级写错, server必须在http里。nginx -t退出码 1[emerg] unknown log format "main"access_log ... main;写在log_format main之前了[emerg] "proxy_pass" cannot have URI part in location given by regular expression, or inside named location, or inside "if" statement, or inside "limit_except" block正则/命名 location/ if/limit_except里proxy_pass不能带路径,改用rewrite ... break[emerg] balancing method does not support parameter "backup"ip_hash/hash与backup互斥[warn] load balancing method redefined同一 upstream写了两种算法,后者生效[emerg] open() "/tmp/ngx3/uwsgi_params" failed (2: No such file or directory)include的相对路径按配置文件所在目录解析,写绝对路径[emerg] bind() to 0.0.0.0:80 failed (98: Address already in use)端口被占, ss -ltnp找占用者,或fuser -k 80/tcp[emerg] no host in upstream ""proxy_pass http://$http_host;这类变量写法缺resolver,或变量为空[emerg] the "stream" directive is not allowed herestream是动态模块,apt install libnginx-mod-stream后nginx -T里才看得到 -
运行期状态码
状态码 典型日志 真实原因 400 The plain HTTP request was sent to HTTPS port用 http 打了 https 端口(实测) 403 — allow/deny拒绝(实测本机访问只允许10/8的 location → 403)401 WWW-Authenticate: Basic realm="..."auth_basic未带或带错凭证(实测)413 — 请求体超过 client_max_body_size(实测 64 字节上限时 100 字节请求体 → 413)404 open() "/tmp/ngx/html/limited2/lim.txt" failed (2: ...)root语义理解错(root + 完整 URI),或try_files兜到=404404 no resolver defined to resolve xxxproxy_pass用了变量却没配resolver500 rewrite or internal redirection cycle while processing "/loop2"rewrite/try_files 互相指,超过 10 次 500 [alert] 64 worker_connections are not enough while connecting to upstream连接数撞上限(实测由「自己代理自己」触发) 502 connect() failed (111: Connection refused) while connecting to upstream后端没起 / 地址端口写错(实测 uwsgi、fastcgi 两条链路都是这个) 502 upstream server temporarily disabled while reading response header from upstream命中 proxy_next_upstream条件,该后端被临时摘除503 limiting requests, excess: 3.986 by zone "req2"limit_req生效(实测)504 upstream timed out (110: Connection timed out) while reading response headerproxy_read_timeout太短,后端确实慢 -
三条排查习惯
- 改完先
nginx -t,再看error.log,最后才怀疑代码。-t只报第一个致命错误,所以「改一处报一处」是正常现象,不要以为改坏了十处。 nginx -T是唯一能看清「到底加载了哪些文件、最终生效的配置是什么」的手段。sites-enabled是符号链接、conf.d与sites-enabled都可能定义同名 server,靠肉眼翻文件很容易看漏。- 验证行为要用真实内容,不要用
return。这条是本文踩得最多次的坑:limit_req、limit_conn、auth_basic、allow/deny在return型 location 上全部静默失效(实测),换成静态文件或proxy_pass才测得出真实效果。
- 改完先
参考
- nginx 官方文档首页
- Module ngx_http_core_module:
location、root/alias、try_files、error_page、expires、add_header、gzip等指令的权威定义与默认值。 - Module ngx_http_proxy_module:本文
proxy_*全部指令的出处,含proxy_redirect与proxy_next_upstream的参数表。 - Module ngx_http_upstream_module:
server参数、ip_hash/hash/least_conn/random/keepalive。 - Module ngx_http_rewrite_module:
rewrite的 flag 与if的限制(这一页顶部就是官方版的「if is evil」警告)。 - Reverse proxy guide(Nginx 管理指南):反向代理与 WebSocket 的官方示例。
- nginx 下载与版本线:Mainline / Stable 的定义,本文写作时实测为 1.31.8 与 1.30.6。
- Tengine 用户手册:正向/反向代理与负载均衡的概念部分讲得比官方文档更通俗,适合入门先读它再回来查指令表。